Stairarm Replacement
About
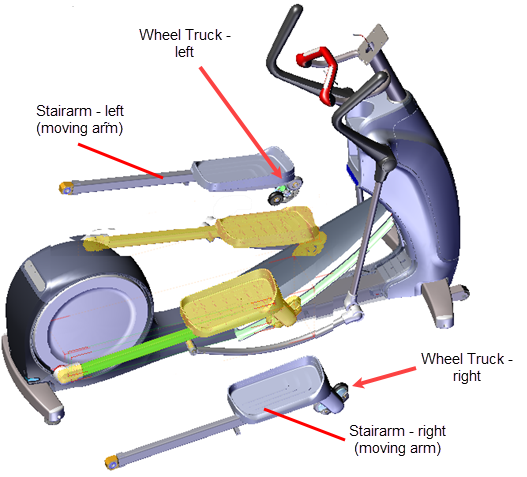
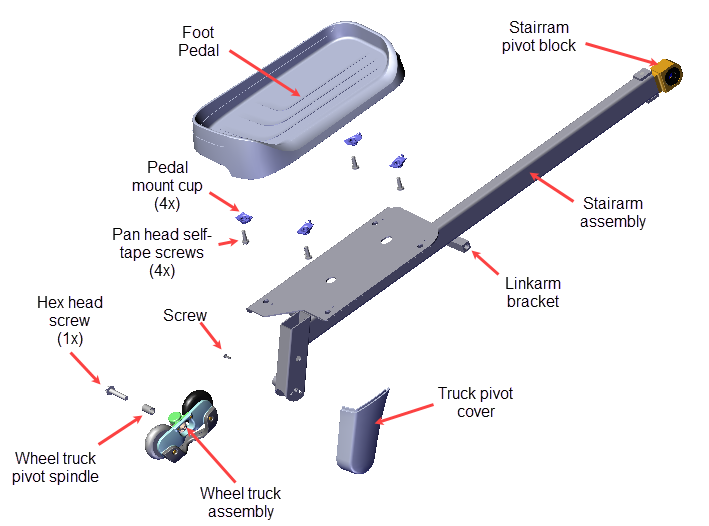
This procedure provides instruction to remove and install the Moving and Fixed Arm model Stairarms.
Specifications
| System Component | Specification |
|---|---|
| Link Arm Fastener | 300 +/- 90 in-lbs (34 +/- 10 Nm) |
| Crank Retention Plate Screw | 30 +/- 9 in-lbs (3.4 +/- 1 Nm) |
Procedure
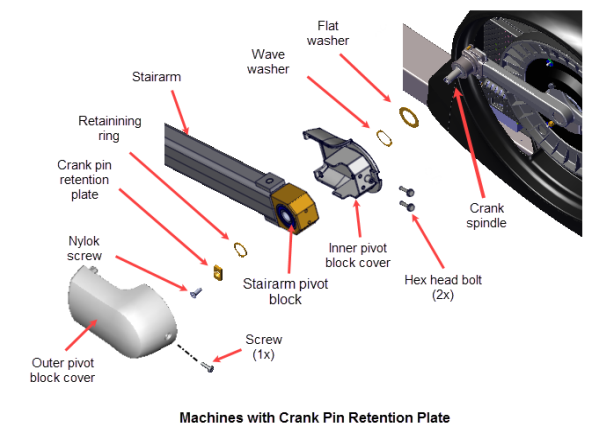
Use this procedure for machines with the updated Input Drive assembly modified to better secure the stairarm onto the Input Drive Crank. The crank spindle was modified to accept additional stairarm fastener hardware including a Crank Pin Retention Plate to secure the stairarm to the crank.
Review entire procedure before starting.
Removal Instructions
Repeat this procedure for both the left and right Stairarm removal.
Stairarm Input Drive Crank Removal
- Remove the Stairarm from the Input Drive Crank:
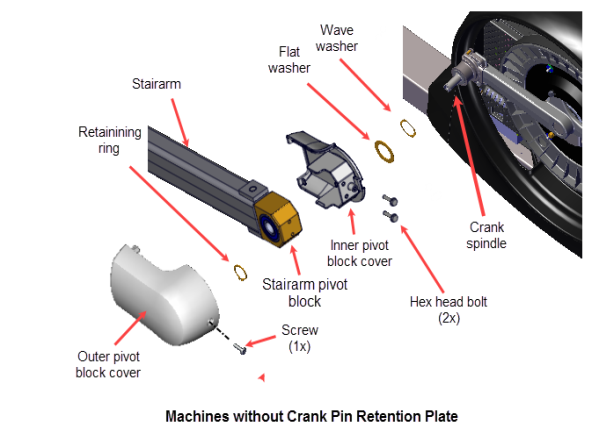
- Remove the #2 Phillips screw fastener and slide the Outer Pivot Block cover rearward and away from the frame to remove. Retain part(s) and/or fastener(s) for installation.
- Remove the #3 Phillips Nylock screw and the Crank Retention Plate. Discard the Nylock screw and retain the Crank Retention Plate for installation.
- Use external 0.047" retaining ring pliers to remove the Stairarm Pivot Block retaining ring. Retain part(s) and/or fastener(s) for installation.
- Remove the Stairarm off the Crank Spindle and carefully lay on the floor.
- Remove the Pivot Block inner wave washer and flat washer off the Crank Spindle. Note that the flat washer sets against the crank. Retain part(s) and/or fastener(s) for installation.
- Remove the two 5/16" hex head bolts and remove the Inner Pivot Block cover. Retain part(s) and/or fastener(s) for installation.
- Remove the Stairarm from the ramp. Roll the wheels down the track and off the back of the ramp.
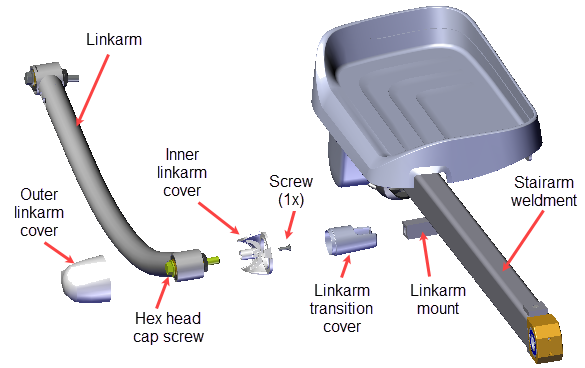
- Remove the Linkarm from the Stairarm (moving arm models only):
- Remove the #2 Phillips screw fastener and remove the Outer Linkarm Cover. Retain part(s) and/or fastener(s) for installation.
- Remove the 9/16" hex head cap screw and remove the Linkarm from the Stairarm weldment - Linkarm bracket and carefully lay onto the floor.
- Remove the Inner Linkarm cover from the Stairarm weldment - Linkarm bracket. Retain hardware and fastener for installation.
|
|
CAUTION: Do not reuse the removed Retention Plate Nylock patch screw fastener for installation. Discard the removed bolts and order new bolts for installation, see Exploded View Diagrams, bubble # 283. |
- Reinstall the Linkarm onto the Stairarm (moving arm models only):

- Make sure the Linkarm Transition cover is installed onto the Stairarm weldment Linkarm Mount.
- Position the Inner Linkarm cover onto the Linkarm and then install the Linkarm onto the Stairarm weldment Linkarm Mount. Secure using 9/16" hex head cap screw and torque to 300 +/- 90 in-lbs (34 +/- 10 Nm).
- Reinstall the Outer Linkarm Cover and secure using the #2 Phillips screw.
- Reinstall the Stairarm wheels onto the ramp. Carefully place the wheels onto the back of the track and then slide the wheels up the ramp.
- Reinstall the Stairarm onto the input drive Crank Spindle:
- Reinstall the Inner Pivot Block cover onto the Stairarm Pivot Block and secure using two 5/16" hex head bolts.
- Install the flat washer and then the wave washer onto the Crank Spindle. Note that the flat washer sets against the crank.
- Then slide the Stairarm Pivot Block onto the Crank Spindle. Secure using the retaining ring and external 0.047" retaining ring pliers.
- Reinstall the Crank Retention Plate and secure using a NEW #3 Phillips Nylock screw (see Exploded View Diagrams, bubble # 283).
- Reinstall the Outer Pivot Block cover and secure using the #2 Phillips screw.
- Verify machine operation and return to service, see Operation Verification.
Stairarm Input Drive Crank Installation

|
|
CAUTION: Do not reuse the removed Retention Plate Nylock patch screw fastener for installation. Discard the removed bolts and order new bolts for installation, see Exploded View Diagrams, bubble # 283. |
Use this procedure for machines with the original Input Drive assembly (original Input Drive assembly does not include the modified crank and additional stairarm fastener hardware).
Review entire procedure before starting.
Removal Instructions
Repeat this procedure for both the left and right Stairarm removal.
- Remove the Stairarm from the Input Drive Crank:
- Remove the #2 Phillips screw fastener and slide the Outer Pivot Block cover rearward and away from the frame to remove. Retain part(s) and/or fastener(s) for installation.
- Remove the two 5/16" hex head bolts. Retain part(s) and/or fastener(s) for installation.
- Use external 0.047" retaining ring pliers to remove the Stairarm Pivot Block retaining ring. Retain part(s) and/or fastener(s) for installation.
- Remove the Stairarm off the Crank Spindle and carefully lay on the floor.
- Remove the Inner Pivot Block cover
- Remove the Pivot Block flat washer and wave washer off the Crank Spindle. Note that the wave washer sets against the Crank. Retain part(s) and/or fastener(s) for installation.
- Roll the wheels down the track and off the back of the ramp.
- Remove the Linkarm from the Stairarm (moving arm models only):
- Remove the #2 Phillips screw fastener and remove the Outer Linkarm Cover. Retain part(s) and/or fastener(s) for installation.
- Remove the 9/16" hex head screw and remove the Linkarm from the Stairarm weldment - Linkarm bracket and carefully lay onto the floor.
- Remove the Inner Linkarm cover from the Stairarm weldment - Linkarm bracket. Retain hardware and fastener for installation.

- Reinstall the Linkarm onto the Stairarm (moving arm models only):

- Make sure the Linkarm Transition cover is installed onto the Stairarm weldment Linkarm Mount.
- Position the Inner Linkarm cover onto the Linkarm and then install the Linkarm onto the Stairarm weldment Linkarm Mount. Secure using 9/16" hex head screw and torque to 300 +/- 90 in-lbs (34 +/- 10 Nm).
- Reinstall the Outer Linkarm Cover and secure using the #2 Phillips screw.
- Reinstall the Stairarm wheels onto the ramp. Carefully place the wheels onto the back of the track and then slide the wheels up the ramp.
- Reinstall the Stairarm onto the input Drive Crank Spindle:
- Install the wave washer and flat washer onto the Crank Spindle. Note that the wave washer sets against the crank.
- Reinstall the Inner Pivot Block cover onto the Stairarm Pivot Block. Thread the two 5/16" hex head bolts just enough to hold the cover in place. Do not fully tighten the bolts which will not allow the stairarm to slide onto the Crank Spindle.
- Then slide the Stairarm Pivot Block onto the Crank Spindle. Use the external 0.047" retaining ring pliers to reinstall the Stairarm Retaining Ring onto the Crank Spindle.
- Fully tighten the two 5/16" Inner Pivot Block cover hex head bolts.
- Reinstall the Outer Pivot Block cover and secure using the #2 Phillips screw.
- Verify machine operation and return to service, see Operation Verification.
Stairarm Input Crank Installation
