Brake Pad Replacement
About
This procedure provides instruction to remove and install the Brake Pad.
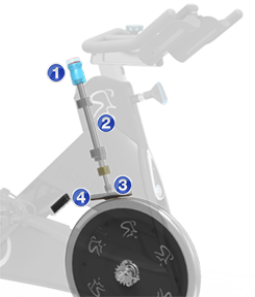
The leather pad is an extremely simple and reliable resistance system. The resistance adjustment knob is used to apply pressure and increased friction to the flywheel creating changing pedal resistance.
|
|
|
Procedure
Review entire procedure before starting.
Removal Instructions
- Remove all tension from the brake pad by turning the resistance knob counterclockwise (-) until completely loose.
- Remove the brake pad assembly
 by removing the mounting bolts (2x) using a 5 mm hex key, Retain part(s) and/or fastener(s) for installation.
 .
.
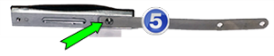
- Remove the brake pad
 by removing the one mounting bolt using a 3 mm hex key. Retain part(s) and/or fastener(s) for installation.
Installation Instructions
- Reinstall the brake pad onto the assembly and secure with the mounting bolt.
- Pull up the resistance knob and slide the brake pad assembly into position aligning the frame mounting bolt inserts. Secure using the two 5 mm hex hey mounting bolts (2x) and washers (2x). Make sure that the brake pad is centered on the flywheel rim and fully tighten.
- Verify that the brake pad is centered onto the flywheel.
- Verify the bike operation per Operation Verification Checklist and return to service.
See Also