Resistance Knob Replacement
About
This procedure provides instruction to remove and install the Resistance Knob assembly.
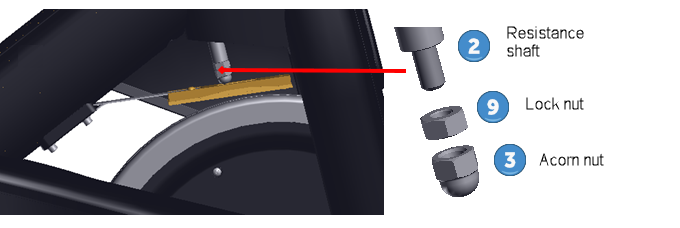
The resistance knob is fixed to the steel resistance shaft capped with an acorn nut that applies pressure to the leather brake pad assembly. The brake pad assembly must be removed to access and remove the resistance shaft acorn nut.
|
|
|

Procedure
Review entire procedure before starting.
Removal Instructions
- Remove all resistance (pressure on the brake pad) by turning the resistance knob counterclockwise (-) until it reaches the stop.
- Remove the brake pad assembly
 by removing the mounting bolts (2x) and washers (2x) using a 5 mm hex key, Retain part(s) and/or fastener(s) for installation.

- Remove the resistance shaft acorn nut
 and lock nut
  . Use one 17 mm wrench to hold the acorn nut while using another 17 mm wrench to loosen the lock nut . Then loosen and remove the acorn nut
  .
.
|
TIP: You may find it easier to tip the bike upright onto the handlebars to access and remove the resistance shaft acorn nut. |
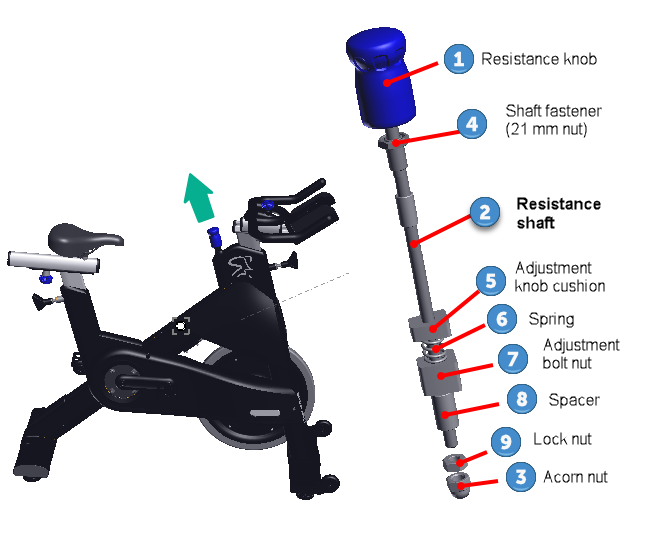
- Turn the resistance knob
 counterclockwise to expose the resistance shaft 21 mm fastener nut
  . Then use a 21 mm wrench to remove the nut . Turn the resistance knob counter-clockwise while lifting to remove the resistance shaft
  from the frame. The following parts could fall from the bottom of the resistance shaft during removal: the spacer
  , adjustment bolt nut
  , spring
  , or adjustment knob cushion
  . Retain part(s) and/or fastener(s) for installation.
Installation Instructions
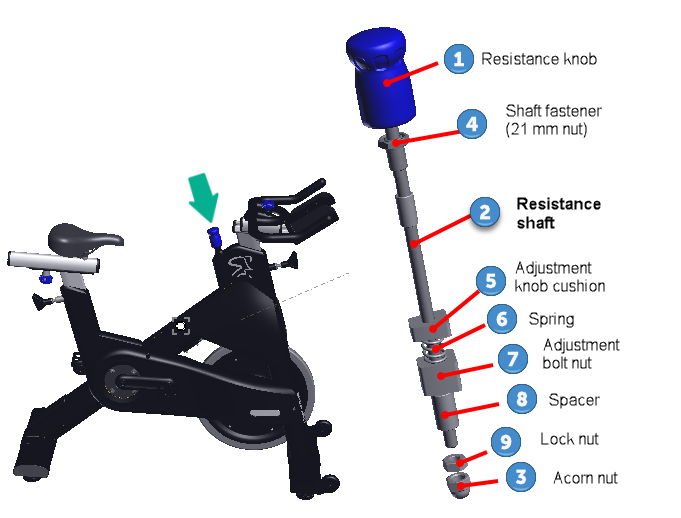
- Reinstall the resistance shaft into the frame while carefully turning the knob in a clockwise direction. It is easy to cross thread the fine resistance shaft threads while installing.
- Raise the resistance knob (turn counter-clockwise) enough to allow room to hand thread the 21 mm shaft fastener nut onto the frame. Then use a 21 mm wrench to fully tighten the nut .
- Reinstall any resistance shaft hardware that could have fallen off during the shaft
 removal including: the spacer , adjustment bolt nut , spring , and/or adjustment knob cushion . Make sure that the hardware is reinstalled in the proper order.
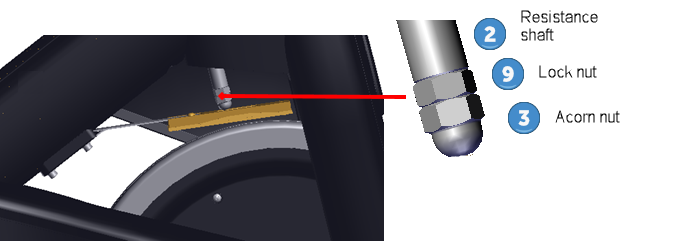
 - Reinstall the the shaft acorn nut
 and shaft lock nut .
 - First tread the shaft lock nut onto the resistance shaft followed by the shaft acorn nut .
- Then fully tighten the shaft 17 mm acorn nut . Thread the shaft lock nut far enough onto the resistance shaft so that there is enough room to fully tighten the acorn nut.
- Fully tighten the acorn lock nut against the shaft acorn nut . Use one 17 mm wrench to hold the shaft acorn nut tight while using another 17 mm wrench to fully tighten the lock nut against the acorn nut. It's important to lock the acorn nut in place to keep it from loosening during bike workouts.
- First tread the shaft lock nut
- Pull up the resistance knob and slide the brake pad assembly into position aligning the frame mounting bolt inserts. Secure using the two 5 mm hex hey mounting bolts (2x) and washers (2x). Make sure that the brake pad is centered on the flywheel rim and fully tighten.
- Verify the resistance control and stop brake functions work properly.
- While riding the bike, turn the resistance knob from minimum to maximum and verify the pedal resistance changes as expected.
- While riding the bike, press down on the resistance knob and verify that the flywheel and pedals quickly stop.
- Verify the bike operation per Operation Verification Checklist and return to service.
See Also