Brake Pad Adjustment
This procedure provides instruction to adjust the Magnetic Brake Pads.
The brake pad-flywheel gap must be correctly set to insure proper resistance level, AutoCal, and power measurement (watts).
Perform the brake pad adjustment any time the brake pads are replaced or any condition were the resistance is not performing correctly or the power measurement is not being correctly computed.
Strong magnetic force
The brake pads have a very strong magnetic force and attraction to the flywheel or any ferromagnetic metal object. . The brake pads can easily be ripped from your grasp and snap against the metal object damaging the pad. Be very careful to hold the brake pads tightly when in close proximity to the flywheel during the brake pad removal and installation procedures.
|
|
CAUTION: The magnetic force of the brake pad is very strong and when in close proximity to the flywheel (or any metal object) will quickly snap the pad against the flywheel (or other metal) object causing damage to the brake pad magnets. Firmly hold the magnetic brake pads during removal/installation procedures to avoid damaging the brake pads. |
Specialized Tools
| Tool | Part Number | Qty | |
|---|---|---|---|
| Magnetic Gap Fixture kit* |
|
PPP000000058248101 | 1* |
| Note: * Each Magnetic Gap Fixture kit contains two (2x) Magnetic Gap Fixture tools. Only one kit is required to complete the brake pad adjustment. |
|||
Procedure
Review entire procedure before starting.
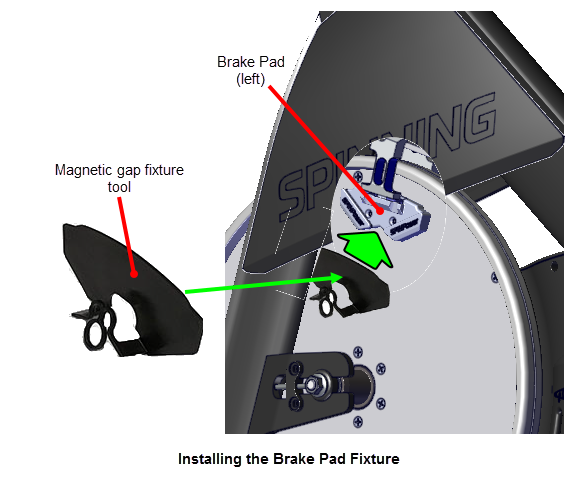
- Loosen the resistance knob enough to allow the installation of the magnetic gap fixture tool.
- Mount a magnetic gap fixture (2x) onto both the left and right brake pads. Slip the back of the magnetic gap fixture into the gap between the brake magnetic pad and the flywheel surface. Continue sliding the fixture over the brake pad and press into position.
|
|
Note: It is recommended that a magnetic gap fixture (2x) be mounted on both the left and right brake pads before starting and while performing the brake pad gap adjustment procedure. |
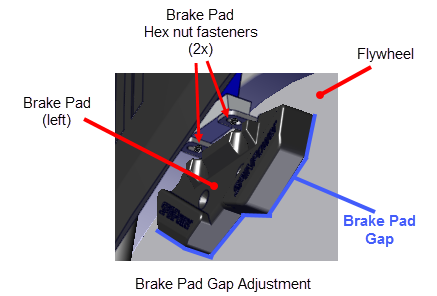
- loosen, but do not remove, the left and right brake pad 3 mm hex key mounting bolts ( 2x per pad).
- Apply maximum resistance, fully turn the resistance knob in the clockwise (+) direction.
- Adjust the left and right brake pads so that the magnetic gap fixture tool touches the flywheel surface. Then fully tighten the 3 mm hex key fasteners (2x per pad).
- Loosen the resistance and remove the magnetic gap fixture tools from the left and right brake pads.
- Verify resistance operation:
- Turn the resistance knob to minimum resistance.
- Start pedaling the bike at 60 rpm or greater while increasing the resistance level to maximum and returning to minimum resistance. Stop pedaling and allow the flywheel to stop:
- Verify that changing the resistance level from minimum to maximum and back to minimum was smooth and that there were no issues with the resistance knob or caliper assembly.
- Verify that at maximum resistance, the pedal resistance was very strong (If possible, compare with a similar bike in known good operating condition).
- Verify that there were no unusual noises from the brake pads during this operation.
- Verify the power (watts) measurement:
- Auto-cal the bike:
- Set the resistance to minimum.
- Start pedaling the bike at 55 rpm or greater, then slow down and allow the pedals to stop. When the flywheel stops, the bike will perform the power measurement AutoCal. Wait a minimum of 10 seconds for the AutoCal to complete.
(Spinner® ChronoSpinner® Chrono™ Power bike.™ Power model only)
|
|
IMPORTANT: The resistance knob must be set to the minimum resistance level to correctly perform the AutoCal function. The WATTS parameter will be incorrectly computed if the resistance knob is not set to minimum resistance level during AutoCal. |
- Verify the measured WATTS at minimum and maximum resistance levels:
- Set the resistance to minimum.
- Start pedaling and maintain the speed at 60 rpm as reported on the console RPM. While continuously pedaling, verify the measured WATTS is within spec at the minimum and maximum resistance levels. Continuously pedal between measurements.
| Resistance Level |
Power (WATTS) |
|---|---|
| minimum | ≤ 40 Watts @ 60 rpm |
| maximum | ≥ 415 Watts @ 60 rpm |
|
|
IMPORTANT: The bike must be AutoCal'd before making the WATTS measurement. Also, the bike must be continuously pedaled between the min and max resistance WATTS measurements. If the pedals stop, a new AutoCal may occur invalidating the measurements. |
- While riding the bike at 60 rpm, stop pedaling and firmly press down the resistance knob. Verify that the flywheel immediately slows down and stops rotating.
- Verify the bike operation per Operation Verification Checklist and return to service.
See Also