Handlebar Post Removal
About
This procedure provides instruction to remove and install the handlebar Post.
For Spinner® ChronoSpinner® Chrono™ Power bike.™ Power models, the data COMM cable must be removed from the inside the handle bar post weldment to remove the handlebar post.
Select procedure:
Procedure - (Spinner® Chrono™ Power models only)
Review entire procedure before starting.
Removal
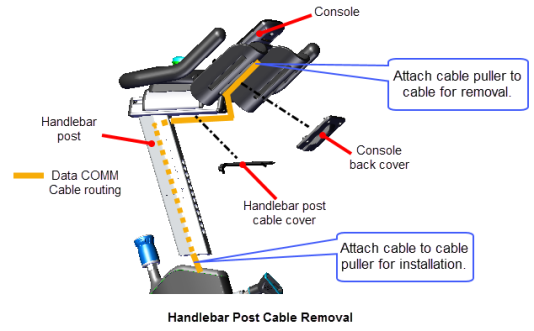
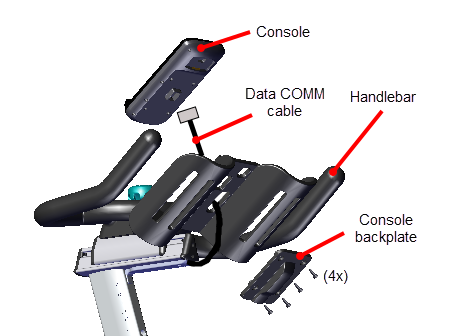
- Remove the four 4 mm (4x) hex key bolts and remove the console backplate cover. Disconnect the data COMM cable from the console and set the console aside, see the "SPINNER® CHRONO™ CONSOLE" Operator's Guide.
- Remove the data COMM cable from the handlebar assembly:
- Remove the two 2.5 mm hex key bolts (2x) and remove the handlebar post cable cover.
- Attach a cable puller to the console connector end of the data COMM cable.
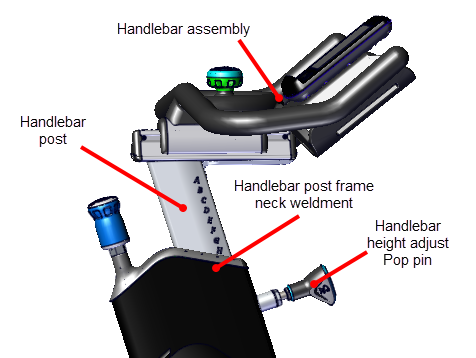
- Pull the handlebar height adjust pop pin and carefuly lift the handlebar post from the top of the frame weldment. While holding the handlebar assembly, gently pull the data COMM cable and attached cable puller from the inside of the handlebar post.
- Disconnect the data COMM cable from the cable puller and set the handlebar post aside. The cable puller will be used to reinstall the cable through the inside of the handlebar assembly.
Installation
- Reinstall the data COMM cable in the handlebar assembly weldment:
- Connect the data COMM cable console connector to the cable puller exiting from the bottom of the handlebar post.
- Lift the handlebar post near to the top of the frame neck weldment.
- Install the handlebar post into the frame neck weldment while gently pulling the cable puller and data COMM cable upward through the handlebar post. Make sure to not pinch or damage the data COMM cable during installation.
- Pull the handlebar height adjust pop pin to secure the post and to adjust the handlebar height.
- Reinstall the handlebar post cable cover using the two 2.5 mm hex key bolts (2x). Do not fully tighten the fasteners until after the console has been installed.
- Position the console on the handlebars and connect the data COMM cable. Adjust the cable slack and reinstall the console backplate, secure using the four hex key bolts (4x) (see the "SPINNER® CHRONO™ CONSOLE" Operator's Guide).
- Make final adjustments to the data COMM cable slack and fully tighten the fasteners handlebar post cable cover.
- Ride the bike and verify that the console powers on and is operating normally.
- Make sure the WATTS, RPM, TIME, DISTANCE, and INTERVAL metrics are reporting correct information.
- Verify the bike operation per Operation Verification Checklist and return to service.
Procedure - (Spinner® Climb™ models only)
Review entire procedure before starting.
Removal
- Pull the handlebar height adjust pop pin and carefuly lift the handlebar post from the top of the frame weldment, see the Operator's Guide for more information.
Installation
- Reinstall the handlebar post into the frame neck weldment
- Pull the handlebar height adjust pop pin to secure the post and to adjust the handlebar height, see the Operator's Guide for more information.
- Verify the bike operation per Operation Verification Checklist and return to service.
See Also