Incline Lift Motor Replacement
About
This procedure provides instruction to remove and replace the Lift Motor.
Procedure
Review entire procedure before starting.
- Switch the input power OFF.
- Remove the front hood.
- Lay the replacement Lift Motor in front of the treadmill allowing room for the actuator/ jack screw to freely move up and down.
- Disconnect the Lift Motor power cable connector from the Power Control Module INCLINE connector and connect the replacement Lift Motor power cable.
Calibrate the replacement Lift Motor prior to installation
|
|
TIP: Remove the MCMotor controller or motor controller module fasteners so that the MC module can be raised to allow easy access to disconnect and connect the I/OInput and Output Interface. connectors. |
- Toggle the treadmill circuit breaker from OFF to ON. The treadmill will begin to auto-reset the actuator to the 0% incline level "Home" position (This is the Lift Motor calibration reference position).
|
|
WARNING: Be aware that the Lift Motor actuator will begin to auto-calibrate causing movement to the Lift Motor actuator when power is applied to the treadmill. |
- Switch the treadmill power to OFF and unplugDisconnect a device power cord plug or cable connector from the power receptacle or outlet. the power cord.
-
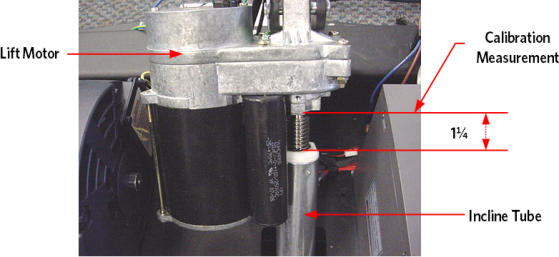
Set the actuator 0% incline reference gap (distance between the top of the actuator tube (or nut) to the bottom of the Lift Motor housing). Firmly hold the jack screw from turning and rotate the actuator tube to adjust the reference distance.
- Switch the input power OFF and unplug the power cord.
- Access the Lift Motor from the bottom by carefully laying the treadmill on its side.
Remove the Lift Motor.
|
|
TIP: If the Lift Motor will raise the treadmill to maximum, you can access the Lift Motor from the front. Connect power and raise the treadmill to maximum incline and resting the frame base onto blocks securely placed under the front corners of the frame (removes weight from the incline platform and Lift Motor actuator tube). Switch power OFF and unplug the power cord. |
- Disconnect the ground wire (green with yellow stripe) from the l frame. Keep screw for motor installable.
- Remove the lift actuator tube from the lift platform, remove the hitch pin and clevis pin.
-
Remove the Lift Motor actuator housing from the frame mounting bracket. Grasp the Lift Motor and remove the Lift Motor housing mount hitch pin and clevis pin. Remove the Lift Motor from the treadmill
Install the Lift Motor.
|
|
NOTE: Be careful to not allow the actuator tube nut to turn during the installation process. This will cause the actuator reference gap to change. |
- Set the calibrated Lift Motor housing into the frame mounting bracket, replace the upper clevis pin and secure with the hitch pin. Be careful to not turn the actuator tube or jack screw while installing the motor.
- Install the actuator tube into the incline platform mounting bracket. It may be necessary to slightly rotate the actuator tube to align the clevis pin mounting holes. Choose the adjustment direction that will minimize the change to the actuator tube reference distance. Hold the jack screw from turning while adjusting the actuator tube.
- Connect the frame ground wire to the treadmill frame, Make sure to route the cable using the frame cable clips to secure the able in position. Securely tighten the mounting screw to ensure very good electrical connectivity.
- Connect the Lift Motor connector to the INCLINE connector on the power control module. Make sure to route and use the frame cable clips to safely secure the cable away from the jack screw.
- Connect the Lift Motor connector to the LIFT connector on the motor control module. Make sure to route and use the frame cable clips to safely secure the cable away from the jack screw.
- Return the treadmill to the upright position.
- Level the Treadmill.
- Install the hood.
- PlugDevice power cord connector or electrical cable male connector that is inserted into an electrical receptacle "outlet" (also called the plug-in). in the power cord and Switch the input power to ON.
- Verify the treadmill incline operation through the full range of motion. Do the - INCLINE TEST diagnostic test.
- Verify treadmill operation (see ) and return to service.
See Also