Drive Motor System Troubleshooting
About
Occasionally, there may be issues with the proper operation of the drive system that do not generate error codes. This troubleshooting procedure is intended troubleshoot the 3-phase Drive Motor System.
If there is a drive motor system Error code from 20 through 29 in the error log, go to the Error Code Troubleshooting Guide for troubleshooting information.
If there are no errors in the error log, yet the drive system appears to have an issue (such as jittery motion) then continue the troubleshooting procedure.
Related Error Codes
Drive system error codes: 20 through 29.
Refer to the Error Code Troubleshooting Guide for error code description and troubleshooting information.
Procedure
Lower Control Module OUTPUT power Check
|
|
NOTE: When taking voltage readings of the ACAlternating Current: electric current which periodically reverses direction between positive and negative polarity. drive motor, the readings may not seem accurate because of the frequencies being used, however, they are indicative of the presence of drive motor voltage and relative frequency changes. |
- If the drive motor starts when you force the running belt to move and the drive motor runs rough, jump to the Drive Motor Winding Check procedure below. If the drive motor will not start, continue with the next step.
- If the drive motor does not start, the lower control module will only apply voltage for a couple of seconds before it shuts down. Therefore the voltage readings in the following step must be taken within the first couple of seconds after the treadmill is instructed to start the running belt. (A multimeter with a peak hold feature is recommended)
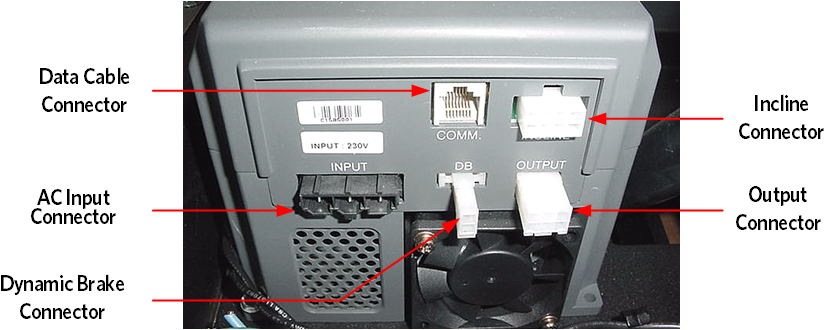
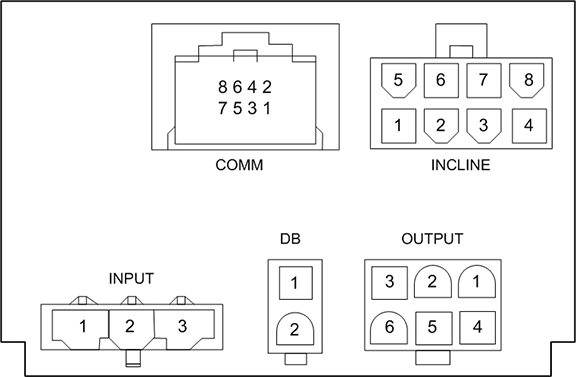
- Connect an AC voltmeter between terminals 4 (red) & 5 (white) of the OUTPUT connector on the lower control module. Set the treadmill ON/OFF switch to the ON position. Press the QUICK START key. If the lower control module is supplying output, you will momentarily read some value of AC voltage. Make a note of the voltage and set the treadmill ON/OFF switch to the OFF position.
- Set the treadmill ON/OFF switch to the OFF position. Repeat the previous AC voltage measurement between terminals 4 (red) & 6 (black) of the OUTPUT connector as the previous step. Voltage should read the same value as the OUTPUT pins 4 and 5. Set the treadmill ON/OFF switch to the OFF position.
- Set the treadmill ON/OFF switch to the OFF repeat the previous AC voltage measurement between terminals 5 (white) & 6 (black) of the OUTPUT connector on the lower control module. The voltage should read the same value as the OUTPUT pins 4 and 5. Set the treadmill’s ON/OFF switch to the OFF position.
- If one or more of the previous OUTPUT voltage readings are not present, replace the lower control module. If the voltage readings are present, continue with the next step.
Drive Motor Winding Check
|
|
CAUTION: All resistance measurements must be performed with power removed from the machine. Performing the resistance measurements with voltage applied to the circuit can damage the multimeter. |
- Set the treadmill’s ON/OFF switch to the OFF position. Disconnect the drive motor connector from the OUTPUT connector on the power control module. With an ohmmeter, measure between terminals 4 (red) & 5 (white), 4 (red) & 6 (black) and 5 (white) & 6 (black) of the drive motor connector. Each reading should be approximately 2.5 ohms. If any of the readings are significantly high or open, replace the drive motor.
- If the ohm readings are correct, inspect the female terminals of the drive motor connector. Verify that they are not spread beyond the point of making good connection with the male pins on the OUTPUT connector on the power control module. If proper connection is not being achieved, replace the drive motor connector.
- If you have performed all of the procedures above and have been unable to correct the problem, call Precor customer support.
See Also
System Troubleshooting Procedures