Covers and Panels Replacement
About
These procedure provides instruction to remove and install the TRMTreadmill covers and panels.
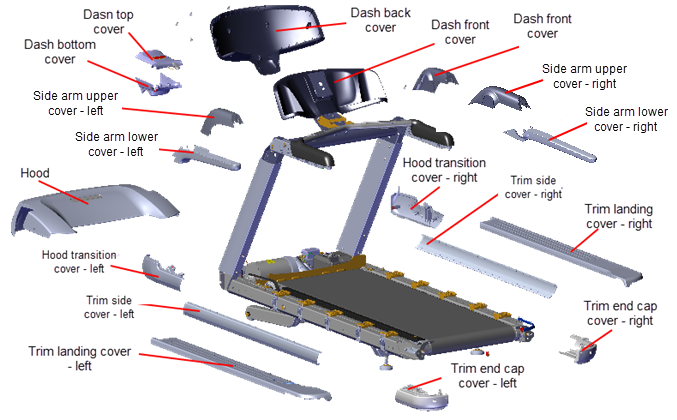
| Cover | Remove/lnstall Procedure |
|---|---|
| Hood Cover | Hood Cover Replacement |
| Hood Transition Cover | Hood Transition Cover Replacement |
| Trim Landing Covers | Trim Landing Covers Replacement |
| Trim End Cap Covers | Trim End Cap Covers Replacement |
| Trim Side Covers | Trim Side Cover Replacement |
| Dash Back Cover | Dash Back Cover Replacement |
| Dash Front Cover | Dash Front Cover Replacement |
| Dash Top Cover | Dash Top and Bottom Replacement |
| Dash Bottom Cover | Dash Top and Bottom Replacement |
| Side Arm Upper Covers | Side Arm Upper/Lower Covers Replacement |
| Side Arm Lower Covers | Side Arm Upper/Lower Covers Replacement |
Cover Replacement Procedures
Click link to open procedure instructions.
| ID | Description |
|---|---|
|
|
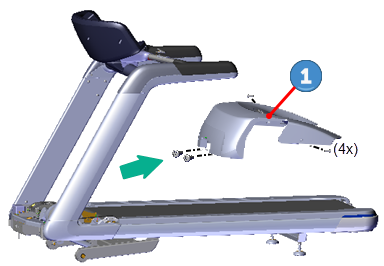
Hood Cover |
Removal Instructions
- Remove the four #3 Phillips hood
 cover screw fasteners. Retain part(s) and/or fastener(s) for installation.
 - Grasp the lower edge of the hood
 cover and pull outwards while lifting to release the tab clip fasteners. Then carefully lift and slide the hood towards the back of the treadmill through the targa uprights to remove.
Installation Instructions
- Position the hood
 cover over the front motor compartment by sliding the hood front through the targa uprights from the back towards the front. Grasp the bottom edge of the hood cover and pull outwards while pressing down on the cover top at the front and back to snap the tab clip fasteners into place.
 - Secure the hood
 cover using the four #3 Phillips screw fasteners and fully tighten.
| ID | Description |
|---|---|
|
|
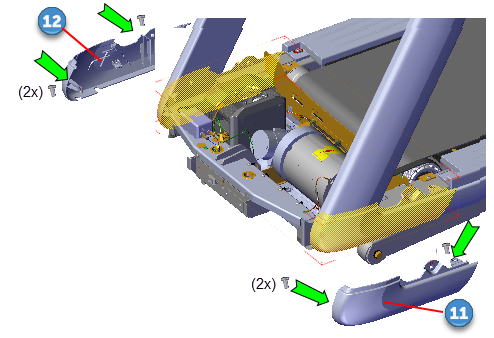
Hood Transition Cover - left |
|
|
Hood Transition Cover - right |
Removal Instructions
Repeat procedure for both the left and right covers.
- Remove the hood cover, see Hood Cover Replacement.
- Remove the two #3 Phillips hood transition cover fasteners. Pull down and away from the frame rail to release tab clips and remove the cover.
- Repeat procedure for both left and right covers.
Installation Instructions
Repeat procedure for both the left and right covers.
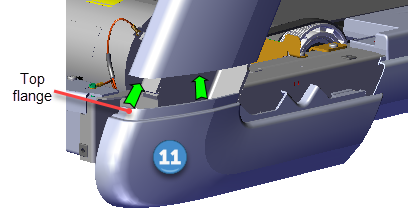
- Position the hood transition cover top flange under the targa upright and press to lock tab clips in place. Secure using the two #3 Phillips fasteners and fully tighten.
- Repeat procedure for both left and right covers.
- Replace the hood cover, see Hood Cover Replacement.
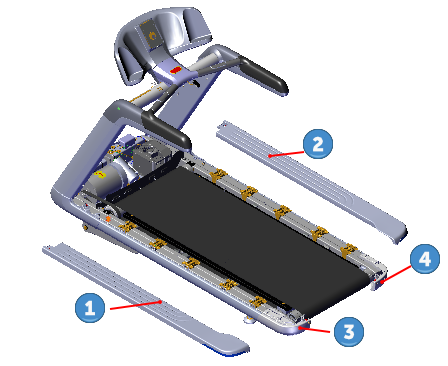
| ID | Description |
|---|---|
|
|
Trim Landing Cover- left |
|
|
Trim Landing Cover - right |
|
|
Trim End Cap - left |
|
|
Trim End Cap - right |
Removal Instructions
The same procedure applies to both the left ![]() and right
and right ![]() trim landing covers.
trim landing covers.
- Remove the hood cover, see Hood Cover Replacement.
- Remove the left
 and right
  trim landing cover #3 Phillips screw (2x), washer (2x), and bushing (2x) fastener hardware. Retain part(s) and/or fastener(s) for installation.
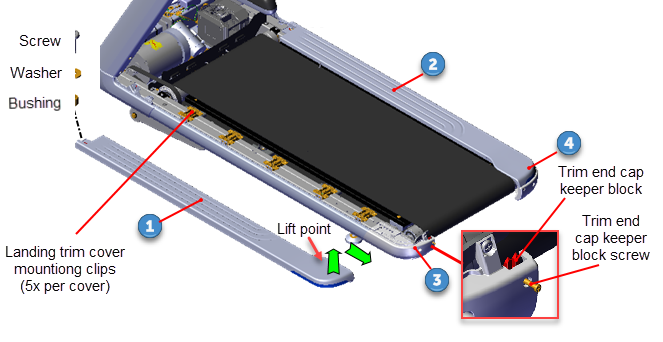
- Loosen the #2 Phillips trim end cap (
 left,
left,  right) keeper block screw fastener to relax tension on the trim landing rear tab clip. Do not remove the keeper block fastener or the keeper block will fall from the inside cover mount. The trim end cap will need to be removed to reinstall the keeper block.
 - Grab the outer edge and the inside edge at the rear of the trim landing cover (see figure lift point) and lift up to release the rear tab clip. Continue to slide the cover rearward to remove. It requires a strong pull to unsnap and release the cover rear tab clip.
- Repeat the same process to remove both the left
 and right
  trim landing covers.
Installation Instructions
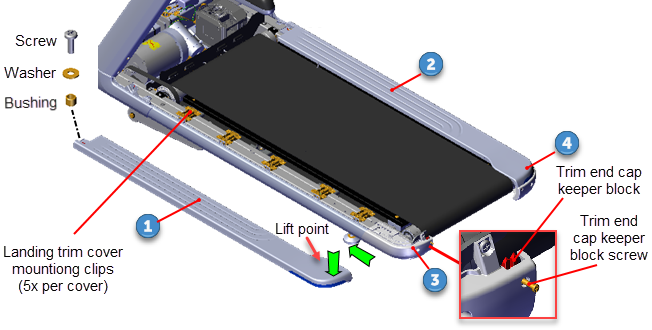
- Install by sliding the cover over the landing trim mounting clips from the back towards the front while pressing down on the cover top. Continue the process until all the landing mount clips lock in place.
- Press down on the top of the cover at the rear (see figure lift point) to lock the rear cover tab clip in place.
- Secure the rear tab clip by fully tightening the #2 Phillips keeper block fastener.
- Secure the front of the trim landing cover using the #3 Phillips screw, washer, and bushing fastener hardware. Fully tighten the fastener.
- Repeat installation procedure for both the left
 and right
  trim landing covers.
 - Reinstall the hood cover, see Hood Cover Replacement.
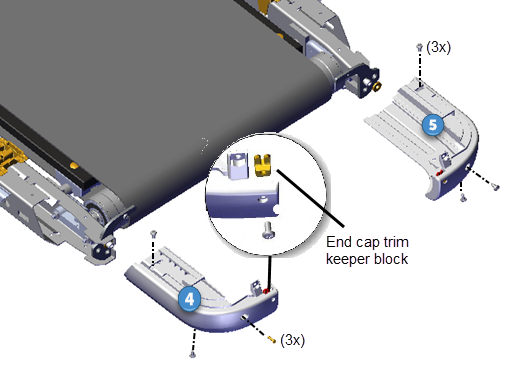
| ID | Description |
|---|---|
|
|
Trim End Cap - left |
|
|
Trim End Cap - right |
Removal Instructions
Repeat procedure for both the left ![]() and right
and right ![]() end cap covers.
end cap covers.
- Remove the hood cover, see Hood Cover Replacement.
- Remove the left and right trim landing covers, see Covers and Panels Replacement.
- Remove the three #3 Phillips left
 and right
  trim end cap cover fastener screws. One fastener on the top, one fastener on the end, and one fastener on the bottom. Retain part(s) and/or fastener(s) for installation.
|
|
TIP: Use a short stub #3 Phillips screwdriver to remove the bottom end cap fastener. |
- Pull the cover away from the frame to release the cover tabs and remove.
- Repeat the same removal procedure to remove both the left
 or right
  trim end cap covers.
Installation Instructions

Repeat procedure for both the left ![]() and right
and right ![]() covers.
covers.
- Reinstall the end cap cover onto the end of the frame rail and press to lock cover tabs in place. Secure using the three #3 Phillips screw fasteners. One fastener on the top, one fastener on the end, and one fastener on the bottom.
- Repeat procedure for both the left and right end cap covers.
- Reinstall the left and right trim landing covers, see Covers and Panels Replacement.
- Reinstall the hood cover, see Hood Cover Replacement.
- Repeat the same installation procedure to install both the left
 and right
  trim end cap covers.
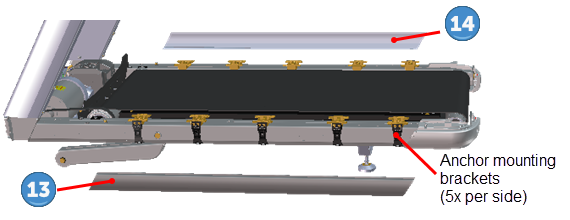
| ID | Description |
|---|---|
|
|
Trim Side Cover - left |
|
|
Trim Side Cover - right |
Removal Instructions
Repeat the removal procedure for both the left ![]() or right
or right ![]() side trim covers.
side trim covers.
- Remove the hood cover, see Hood Cover Replacement.
- Remove the trim landing cover, see Covers and Panels Replacement.
- Remove the hood transition cover, see Covers and Panels Replacement.
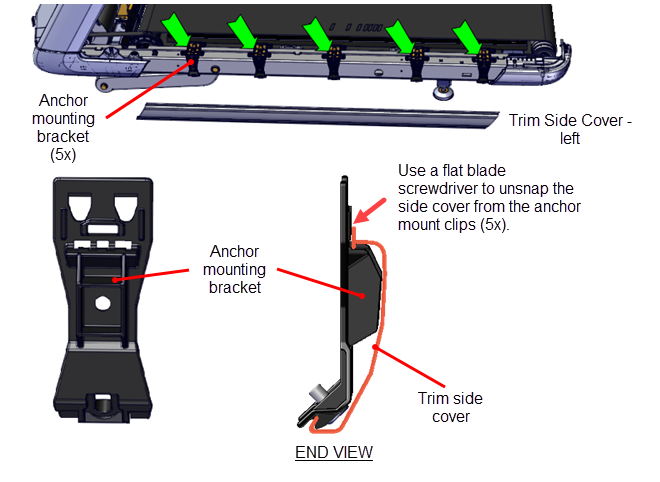
- Starting from the front moving reward, use a standard flat blade screwdriver to release (unsnap) the top of the trim side cover from five anchor mount clips. Hold cover while releasing the upper anchor bracket clips and then pull down and away from the anchor mounts to remove the cover.
Installation Instructions
Repeat procedure for both the left and right covers.
- Mount the trim side cover bottom rim flange onto the bottom of the five anchor mounts making sure to fit the rim flange alignment cutout (located at the bottom rear of the cover) into the rear white anchor bracket. Make sure that the cover is securely attached at all five anchor mounts.
- Next use the palm of your hand to strike the top of the cover at each of the five anchor mounts to engage and lock the cover in place. Make sure that the trim side cover is securely attached at each of the five anchor mounts.
- Reinstall the hood transition cover, see Covers and Panels Replacement.
- Reinstall the trim landing cover, see Covers and Panels Replacement.
- Reinstall the hood cover, see Hood Cover Replacement.
| ID | Description |
|---|---|
|
|
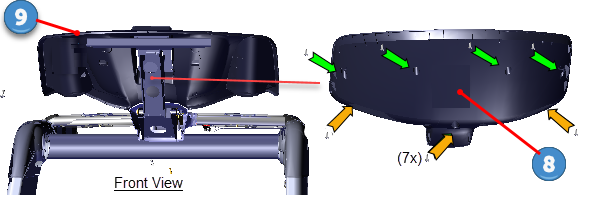
Dash Back Cover |
|
|
Dash Front Cover |
Removal Instructions
- Remove the back cover
 . Start by removing the bottom three #3 Phillips screw fasteners first and then the remaining four top screws. Carefully hold the cover from falling while removing the fasteners. Retain part(s) and/or fastener(s) for installation.
Installation Instructions
- Reinstall and hold the back cover
 into position. Then install the top four #3 Phillips screws first followed by the remaining three bottom screws. Fully tighten all fasteners.
| ID | Description |
|---|---|
|
|
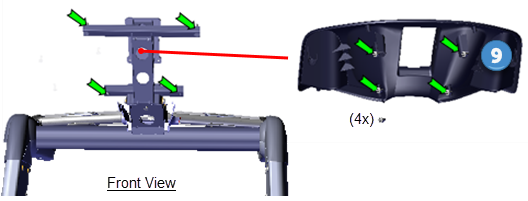
Dash Front Cover |
Removal Instructions
- Remove the back cover
 , see Covers and Panels Replacement.
 - Remove the console, refer to the treadmill assembly guide (700 Line Treadmill Assembly Guide P/N 304387-101).
- Remove the four #3 Phillips screw fasteners and remove the front cover
 . Retain part(s) and/or fastener(s) for installation.
Installation Instructions
- Reinstall front cover
 and secure using the four #3 Phillips screw fasteners.
 - Reinstall the console, refer to the treadmill assembly guide (700 Line Treadmill Assembly Guide P/N 304387-101).
- Reinstall the back cover
 and secure using the seven #3 screw fasteners, see Covers and Panels Replacement.
 - Operate the treadmill and verify the console and machine operation.
| ID | Description |
|---|---|
|
|
Dash Top Cover |
|
|
Dash Bottom Cover |
|
|
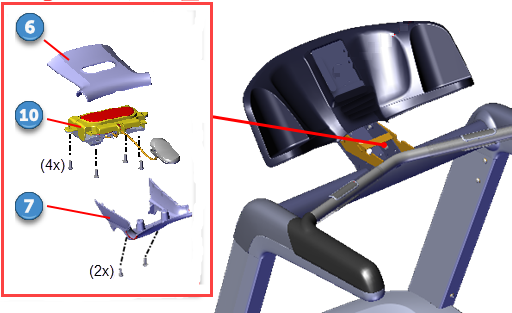
E-Stop Switch Assy |
Removal Instructions
- Remove the two #3 Phillips screw fasteners from the dash assy bottom cover
 . Retain part(s) and/or fastener(s) for installation.
 - Carefully flip the dash top cover
 over and remove the four #2 Philips emergency stop switch (E-Stop)
  fasteners. Carefully lay the E-Stop switch on the HHHRHand Held Heard Rate assy bracket and remove the dash top cover. Retain part(s) and/or fastener(s) for installation.
 - Remove the dash bottom cover
 .from between the dash assembly weldment cross member and HHHR bar.
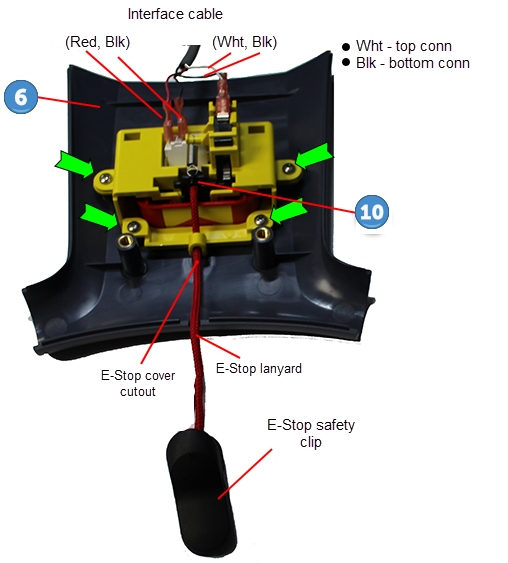
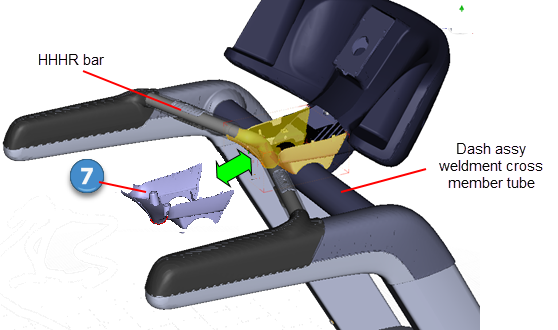
Installation Instructions
- Install the dash bottom cover
 .into position between the dash assembly weldment cross member and HHHR bar.
 - Reinstall the E-Stop switch
 onto the dash top cover
  and secure using the four #2 Philips fasteners. Make sure the interface cable electrical (red/black, white/black) connections are correctly attached and secure.
 - Position the dash top cover onto the dash bottom cover and secure using the two #3 Phillips fasteners. Make sure the interface cable is routed correctly and not pinched. Make sure that the stop safety clip lanyard is correctly positioned in the cover cut out, is not pinched, and freely moves when pulled and retracted.


This procedure replaces the left/right upper and lower side arm covers.
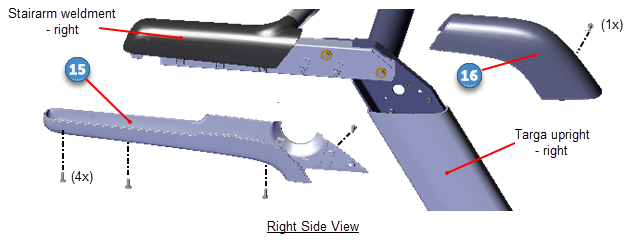
| ID | Description |
|---|---|
|
|
Lower Side Arm Cover - right |
|
|
Upper Side Arm Cover - left |
Removal Instructions
Repeat procedure for both the left and right upper and lower side arm covers.
- Remove the four #3 Phillips screw fasteners from the side arm cover
 . Pull the cover down and back to remove. Retain part(s) and/or fastener(s) for installation.
 - Remove the one #3 Phillips screw from the upper side arm cover
 . Pull the cover up and forward to remove. Retain part(s) and/or fastener(s) for installation.
Installation Instructions
Repeat procedure for both the left and right upper and lower side arm covers.
- Position the upper side arm cover
 onto the side arm weldment and press to lock the tab clips in place. Secure using the one #3 Phillips screw,
 - Position the lower side arm cover
 onto the side arm weldment and press to lock the tab clips in place. Secure using the four #3 Phillips screws.