System Software
About
The console operating system software is also referred to as the "Preva Operating System" software. This topic will show you how to find the current software versions and how to update the console software.
You can manually update the software or configure the console to automatically update the software (this requires the console to be registered and connected to internet).
When updating the operating system software, the update software bundle installs the following system component software:
- CPATouchscreen console Control Processing Assembly. software
- LPCALower printed circuit assembly; generally this refers to the lower board. On treadmills, this is the motor controller unit (MCU), and on self-powered units, it is the main board in the lower section. software
- Qt App software
- Boot Kernal software
- File System software
This software Topic contents:
- How to find the operating system software versions
- How to Update the console operating system software
- Rescue microSD card software install
How to find the operating system software versions
Console shortcut - operating system software version
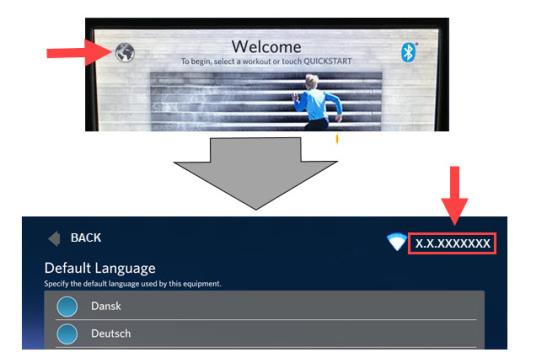
- Power up the console to the default "Welcome" screen.
- Select the Globe icon (top left).
- The console installed software version is shown on the top right corner of the Language screen.
How to find the operating & component system software versions
- Power up the console to the default "Welcome" screen.
- Access the Diagnostics menu (access code 51765761).
- Select About.
- The Release Bundle Version menu item shows the installed OS software version.
- Select Release Bundle Version to view the system component software versions:
- CPA software version
- LPCA software version
- Qt App software version
- Boot Kernel software version
- File System software version
How to Update the console operating system software
Download the latest operating software version
- Login to the Precor Partner's (Precor Connect) website and navigate to the "SOFTWARE DOWNLOAD CENTER" website (select Service Documentation > Console Software).
- Locate the latest (most current) P82 software version.
- Click the download software link.
- Enter the Sign in dialog box Username and Password:
- Select OK to download the P82 software zip file. The browser will automatically begin the download process after selecting OK.

Username: software
Password: D0wnl0ads!
Installing the operating system software
- On a USBShort for Universal Serial Bus, is an industry standard developed in the mid-1990s that defines the cables, connectors and communications protocols used in a bus for connection, communication, and power supply between computers and electronic devices. flash drive, create a folder named “precor” in the root directory.
- Move the downloaded software zip file to the USB flash drive by right-clicking the zip file, selecting “extract all.”, browsing to the "precor" flash drive folder, and selecting "Extract" to download.
|
|
IMPORTANT: You must place all software files into the “precor” folder on your USB flash drive. Failure to follow the instructions exactly will result in the console not recognizing the available software update on the USB flash drive. |
- Insert the updated USB flash drive into the console chin USB port.
|
|
IMPORTANT: The microSD card MUST be properly seated (locked in place) in the microSD port or the chin USB port will not load the software, see Console I/O Port Diagram. |
- Access the Diagnostic menu (access code 51765761).
- From the Settings menu, select the Available Updates menu to open the Available Updates screen.
|
|
Note: If the menu item is "No Available Updates, the software was not properly installed on the flash drive. Remove the USB flash drive and reinstall the latest software onto the USB flash drive "precor" folder. |
- Select (highlight) the latest software version and select INSTALL to begin the software installation.
Rescue microSD card software install
When to use the Rescue microSD card
Typically the rescue microSD card is required when the OS software has become corrupted and the console fails to power‑up to the Welcome banner. Only use the rescue microSD card as a last resort, reseting the console and/or updating the OS software have failed to fix the problem.
The Rescue microSD card will upload the core software required to reboot the console to the OEM factory default state. All custom system settings will be reset to the OEM default settings, treat the console as if it were a brand new console.
|
|
IMPORTANT: Using the rescue microSD card will reboot the console to the factory default settings. All setup and customized settings will be reset to OEM default setting including: Registration, TV channel guide, club settings, etc. If the console is networked, the unit will need to be deleted from Preva Business Suite and re-registered. |
Rescue microSD card update procedure
- Disconnect console power (power OFF).
- Remove the mass storage mircoSD card and install the Recovery microSD card.
- Reconnect the console power (power ON).
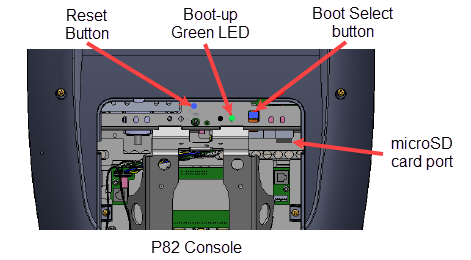
- Lightly press and hold down the Boot Select button while momentarily pressing and releasing the Reset button. Starts the reboot process.
- On P82s, you will need two 5/32" (4 mm) or smaller diameter pencil erasers (or similar devices) to press the Reset and Boot Select buttons.
- On P62s, you only need one pencil eraser to press down the Boot Select button. Use your finger to press and hold the Reset button
- Continue holding down the Boot Select button until either the green boot-up LED switches ON or you can see on the display that the reboot process has started (approx. 3-5 seconds). When the reboot has started release the Boot Select button.
- A successful reboot will show a blue boot‑up progress status bar at the bottom of the display. If the progress status bar does not show, repeat the Recovery microSD card boot-up steps. A successful installation will finish with a green check mark
 , approximately 7-8 minutes. An unsuccessful install will finish with a red "X"
  .
. - Disconnect the console power (Power OFF).
- Remove the rescue microSD card and reinstall the mass storage microSD card.
- Reconnect the console power (power ON).
- Update the operating system software to the latest version, see How to find the operating system software versions and How to Update the console operating system software.
- Reboot the console after the software update has completed, press/release the Reset button or disconnect/reconnect console power.
- Re-register the console;
- First you will need to contact Precor customer service (Ph: +1 (800) 347-8404and have the console registration removed from PBSPreva Business Suite,
- Then do the steps to re-register the console.
- Configure the console system settings:
- If you have a system settings and TV Channel Guide USB flash drive (or you can create one from another machine), import the system settings and TV Channel Guide settings; 1) insert the settings USB drive into the Chin USB port, access the Service menu and select System Settings > Manage Settings > Import from USB, and 2) insert the TV Channel Guide USB drive into the Chin USB port, access the Service menu and select System Settings >TV Settings > Channel Guide > Import from USB.
- If you do not have a settings or TV Channel Guide USB flash drive, you will need to manually update settings as needed.
- Reboot the console (press/release the Reset button or disconnect/reconnect power).
- Verify operation and return to service, see Operation Verification.
P82 Rescue mircoSD software install
P62 Rescue mircoSD software install
