Rear Stabilizer Replacement
About
This procedure provides instruction to remove and install the Rear Stabilizer.
Specifications
Review entire procedure before starting.
Removal Instructions
- Place a soft mat under the bike frame and stand the bike frame on its front resting on the front stabilizer and handlebar
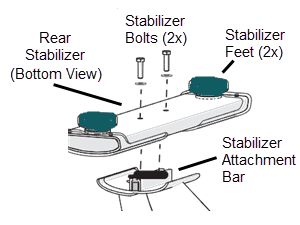
- Remove and retain the two stabilizer feet.
- Remove the rear stabilizer by removing the two mounting bolts and washers using a 6 mm hex hey. Retain fasteners for installation.
|
|
NOTE: The stabilizer attachment bar can slide within the mounting bracket. Make sure the attachment bar remains in position. |
Installation Instructions
- Position rear stabilizer onto the frame and fasten using the two stabilizer mounting bolts and washers, torque to (Undefined variable: SBK800SpinChrono.Spin-StabilizerTorque).
- Install the two stabilizer feet.
- Return bike to upright position.
- Make sure the bike is level and setting firmly on the floor, see Leveling Adjustment Procedure.
- Verify bike operation per Operation Verification Checklist and return to service.

See Also