Drive Belt Tension and Tracking Adjustment
About
This procedure provides instruction to verify and make adjustments to the drive belt tension and tracking. The belt tension and tracking should be verified anytime the flywheel is removed, the belt is replaced, at regularly scheduled preventative maintenance, or when there are any unusual belt related issues (noises, pedal skip, fraying, etc.) while operating the bike.
|
|
CAUTION: Improper belt tension and tracking adjustment will cause premature wear and may void the Precor Limited Warranty. |
Specifications
| System Component | Specification |
|---|---|
| Belt Drive Tension | 60 +/- 5 lbs (27 */- 2 kgs) |
| Axle Nut torque | 29.5 ft-lbs (40 Nm) |
Specialized Tools
| Tool | Part Number |
|---|---|
| Belt Tension gauge | Belt Tension Gauge (recommended Kent-Moore BT-33-73-F) |
Procedure
Review entire procedure before starting.
Belt Tension adjustment
- Remove the front and rear drive belt covers, see Belt Guard Cover Replacement.
- Remove all brake resistance by turning the resistance knob counter clockwise (-).
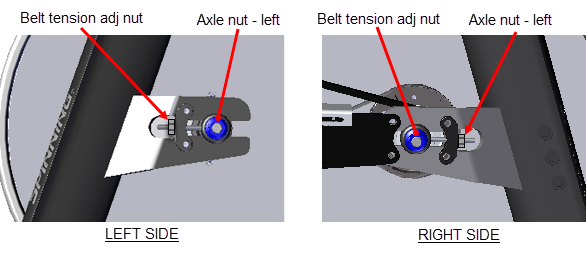
- Loosen the left and right 17 mm axle nuts enough to allow flywheel axle movement. Do not fully remove the axle nuts.
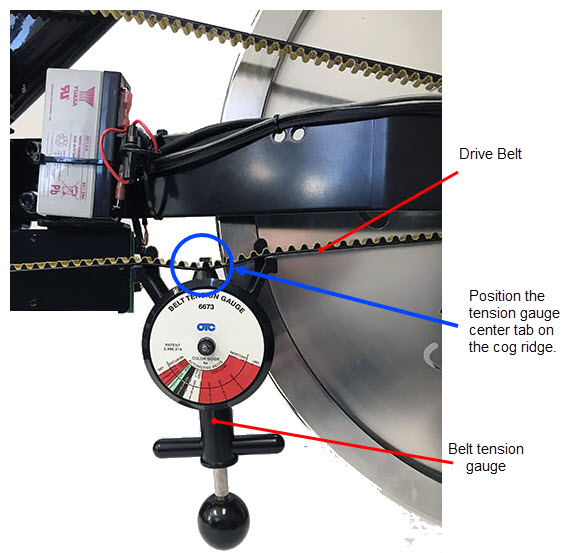
- Place the belt tension gauge on the drive belt midway between the front and rear sprockets. Position the tension gauge so that the center tension tab rests on the belt tooth ridge and not in the gap between the teeth. Read and record the measured belt tension.
- If the measured tension is within the specification limits 60 +/- 5 lbs (27 */- 2 kgs), remove the tension gauge and verify the belt tracking, go to Belt tracking adjustment.
- If the measured tension is not within spec, remove the tension gauge and continue the belt tension adjustment.
- If the belt is under tension, remove the belt tension by alternately loosening the right and left 10 mm hex key belt tension adjustment nuts. Keep a small amount of belt tension so that the belt remains seated on the front and rear sprockets.
- If the drive belt is not centered on the flywheel pulley, slowly turn the pedals while nudging the belt to the center of the sprocket.
- Place the belt tension gauge on the drive belt midway between the front and rear sprockets Position the tension gauge so that the center tension tab rests on the belt tooth ridge and not in the gap between the teeth.
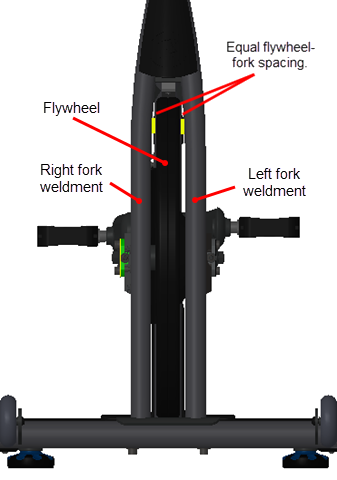
- Incrementally and alternately tighten the left and right tension adjustment nuts so that the flywheel remains centered between the left and right fork weldments. Continue the adjustment process until the belt tension gauge reads, 60 +/- 5 lbs (27 */- 2 kgs).
- Remove the tension gauge. Then hand turn the crank to break-in the belt. Stop the belt, place the tension gauge onto the belt and remeasure the belt tension. Make sure the belt tension remains in spec 60 +/- 5 lbs (27 */- 2 kgs). Readjust the tension if out-of-spec.
- Verify the belt tracking, go to Belt tracking adjustment. .


![]()


Belt tracking adjustment
The drive belt tracking does not need to remain perfectly centered on the pulley. The belt is correctly tracking when the belt edges do not rub against either the left or right flywheel pulley rims during use.
|
|
Note: Always use the LEFT belt tension adjustment bolt to make belt tracking adjustments. |

- Hand rotate the pedals and verify that the drive belt does not track either the left or right so that it rubs against the flywheel pulley left (inner) or right (outer) rims. If the drive belt rubs against the pulley inner or outer rims, adjust the tracking alignment to correct the issue:
- If the belt is tracking to the left causing the belt to rub against the inner rim of the pulley, adjust the belt to track to the right and remain centered on the pulley. While rotating the pedals, loosen the LEFT adjustment nut in 1/8 counter-clockwise increments until the belt moves towards the center and no longer rubs against the pulley inner rim.
If the belt moves past the pulley center, slightly tighten (turn clockwise) the LEFT adjustment nut to recenter the belt.
Continue this process until the belt no longer rubs against either the inner or outer pulley rims.
- If the belt is tracking to the right causing the belt to rub against the outer rim of the pulley, adjust the belt to track to the left and remain centered on the pulley. While rotating the pedals, tighten the LEFT adjustment nut in 1/8 clockwise increments until the belt moves towards the center and no longer rubs against the sprocket outer rim.
If the belt moves past the sprocket center, slightly loosen (turn counter-clockwise) the LEFT adjustment nut to recenter the belt.
Continue this process until the belt no longer rubs against either the inner or outer sprocket rim.
- If the belt is tracking to the left causing the belt to rub against the inner rim of the pulley, adjust the belt to track to the right and remain centered on the pulley. While rotating the pedals, loosen the LEFT adjustment nut in 1/8 counter-clockwise increments until the belt moves towards the center and no longer rubs against the pulley inner rim.
![]()
|
|
CAUTION: Damage to the belt edges and unusual noises will occur if the belt is not properly aligned and is rubbing against the sprocket inner or outer rims. |
- Tighten the left and right axle nuts, torque to 29.5 ft-lbs (40 Nm).
- Ride and pedal the bike at high speed for several minutes Verify that there were no tracking issues while riding the bike.
- Stop the pedals, dismount the bike and verify that the belt tension and tracking remain within specification:
- Remeasure the belt tension and verify that it remains within spec 60 +/- 5 lbs (27 */- 2 kgs). Readjust if out-of-spec.
- Inspect the drive belt tracking and make sure the belt is not rubbing against the inner or outer sprocket rims. Readjust if out-of-spec.
- Reinstall the front and rear drive belt covers, see Belt Guard Cover Replacement.
- Verify the bike operation per Operation Verification Checklist and return to service.
See Also