Brake Pad Replacement
About
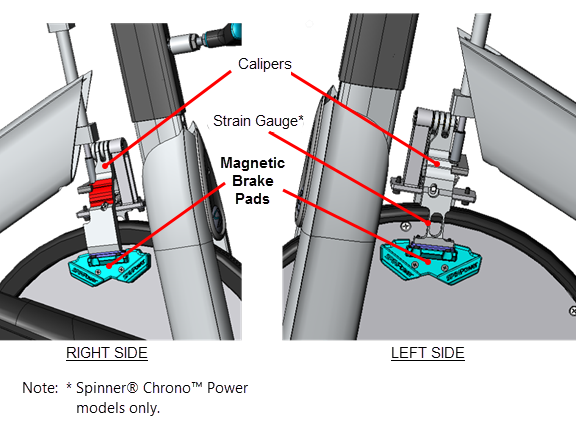
This procedure provides instruction to remove and install the magnetic Brake Pads.
The brake pads use opposed magnetic force to vary the flywheel resistance level and integrated caliper strain gauge to calculate the measured power in watts. The brake pads are mounted on the bottom of the left and right caliper.
Brake pad replacement
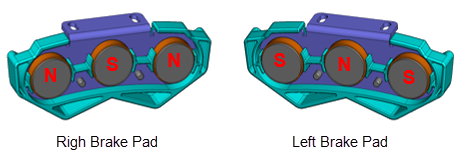
The brake pad magnets are north-south polarized and must be replaced as a set to ensure proper polarization.
Strong magnetic force
The brake pads have a very strong magnetic force and attraction to the flywheel or any ferromagnetic metal object. . The brake pads can easily be ripped from your grasp and snapped against the metal object damaging the pad. Be very careful to hold the brake pads tightly when in close proximity to the flywheel during the brake pad removal and installation procedures.
|
|
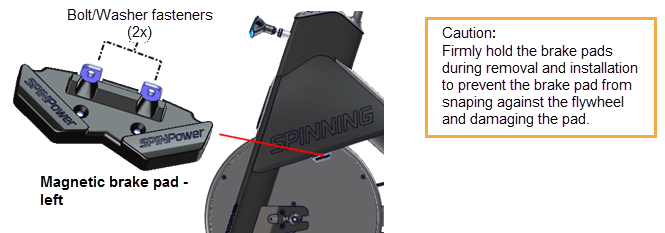
CAUTION: The magnetic force of the brake pad is very strong and when in close proximity to the flywheel (or any metal object) will quickly snap the pad against the flywheel (or other metal) object causing damage to the brake pad magnets. Firmly hold the magnetic brake pads during removal/installation procedures to avoid damaging the brake pads. |
Incorrect Power measurements
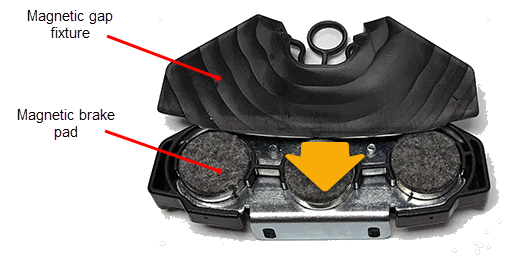
The brake pad-flywheel gap must be calibrated for each installation or whenever it is detected that the power measurement is incorrectly computed. If the brake pad gap is not correctly set, the power measurement AutoCal correction will not be correctly determined causing the resultant Power (watts) measurement to be incorrect. You must use the OEM magnetic gap fixture tool to properly set the gap at installation. The pads have slotted mounting holes to allow brake pad-flywheel gap adjustment.
Inconstant Power measures
If multiple bikes are not showing similar power (watts) results at common torque and rpm settings, the bikes most probably have been incorrectly AutoCalibrated, see Verify the power (watts) measurement: .
Specialized Tools
| Tool | Part Number | Qty | |
|---|---|---|---|
| Magnetic Gap Fixture kit* |
|
PPP000000058248101 | 1* |
| Note: * Each Magnetic Gap Fixture kit contains two (2x) Magnetic Gap Fixture tools. Only one kit is required to complete the brake pad adjustment. |
|||
Procedure
Review entire procedure before starting.
Removal
- Remove all brake pad resistance by turning the resistance knob fully counterclockwise (-).
- Mount a magnetic gap fixture onto both the left and right brake pads.
|
|
Note: It is recommended that a magnetic gap fixture (2x) be mounted on both the left and right brake pads before starting the brake pad installation procedure. The fixture will help to prevent accidental damage to the brake pad and/or scratching the flywheel surface. |
- Firmly hold the left brake pad while removing the two 3 mm hex key bolts and washers. When removing the brake pad past the flywheel the pads strong magnetic attraction can quickly pull the pad from your hand snapping it against the flywheel damaging the brake pad. Retain the pads and fastener hardware for installation.
|
|
CAUTION: The magnetic force of the brake pad is very strong and when in close proximity to the flywheel (or any metal object) will quickly snap the pad against the flywheel (or other metal) object causing damage to the brake pad magnets. Firmly hold the magnetic brake pads during removal/installation procedures to avoid damaging the brake pads. |
- Repeat the procedure to remove the right brake pad.
Installation
- Mount a magnetic gap fixture onto the left and right brake pads.
|
|
Note: It is recommended that a magnetic gap fixture (2x) be mounted on both the left and right brake pads before starting the brake pad removal procedure. The fixture will help to prevent accidental damage to the brake pad and/or scratching the flywheel surface. |
- Reinstall the left and right brake pads onto the respective calipers and secure using the two 3 mm hex key bolts (2x) and washers (2x). Loosely hand tighten the fasteners allowing brake pad movement.
|
|
TIP: Increasing the resistance will move the calipers closer to the flywheel which provides more room between the caliper and frame weldment to install the mounting bolts and washers. |
- Adjust the brake pad gap and verify the resistance knob operation, see Brake Pad Adjustment.
- Verify the bike operation per Operation Verification Checklist and return to service.
See Also