Crank Arm Replacement
About
This procedure provides instruction to remove and install the Crank Arm.
Specifications
| System Component | Specification |
|---|---|
| Crank arm fastener | 33 ft-lb (45 N•m) |
Specialized Tools
| Tool | Part Number | Qty | |
|---|---|---|---|
| Crank Extractor (used to remove pedal) |

|
X-Tools Crank Extractor)(1) or similar |
1 |
|
Medium strength threadlocker |
|
Loctite 243 |
1 |
|
adjustable 36 mm open end wrench |
|
generic part |
|
Procedure
Review entire procedure before starting.
|
|
CAUTION: Be careful not to scratch or dent bike with tools during the removal/installation process. |
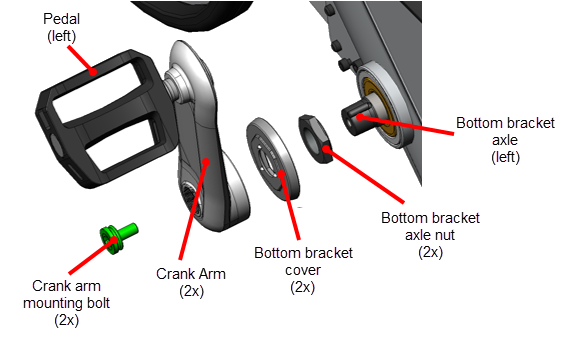
- Remove the left and right pedals, see Pedal Replacement.
- Remove the left crank arm mounting bolt using an 8 mm hex key.
Removal Instructions

- Use a crank puller (recommended Park Tool CCP-222 to pull the crank arm from the bottom bracket bearing axle and remove.
- Remove the bottom bracket cover.
|
|
Note: Early production bikes may not include the bottom bracket cover, see service bulletin SB.SBKSpinner Indoor Cycle.20160825 for information. |
- Remove the bottom bracket axle 36 mm nut. Clean the axle nut and the bottom bracket axle threads. Retain part(s) and/or fastener(s) for installation.
- Repeat steps to remove the right crank arm.
Installation instructions:
- Apply a light coat of multipurpose oil to the 36 mm axle nut threads and install onto the bottom bracket axle. Fully tighten the axle nut.

- Install bottom bracket cover onto the bottom bracket axle over the axle nut.
- Install the left crank arm onto the left side bottom bracket axle. Seat the crank arm by using a rubber mallet to lightly tap the crank arm onto the bottom bracket axle.
- Apply Loctite 243 to the 8 mm hex key crank arm mounting bolt, torque to 33 ft-lb (45 N•m).
- Repeat installation steps to install the right crank arm.
- Install the left and right pedals, see Pedal Replacement.
- Verify the bike operation and return to service, see Operation Verification.
See Also
