Handlebar Assembly Replacement
About
This procedure provides instruction to remove and install the Handlebar Assembly.
Procedure
Review entire procedure before starting.
Removal Instructions
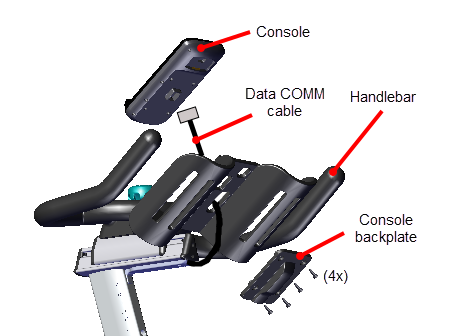
- (Spinner® ChronoSpinner® Chrono™ Power bike.™ Power models only)
Remove the four 4 mm (4x) hex key bolts and remove the console backplate cover. Disconnect the data COMM cable from the console and set the console aside, see the "SPINNER® CHRONO™ CONSOLE" Operator's Guide.
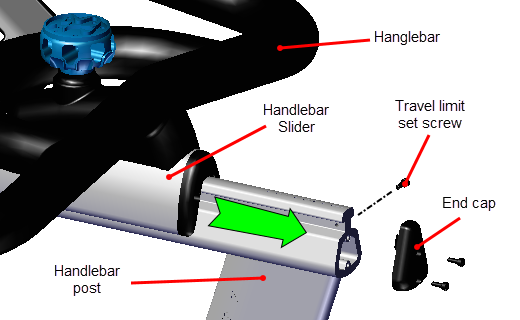
- Remove the rear handlebar post slider end cap by removing the two 2.5 mm hex key bolts. Retain for installation.
- Slide the handlebar forward enough to allow access to handlebar assembly travel limit set screw located at the back end of the handlebar post slider. Remove the rear slider travel limit set screw using a 2.5 mm hex key. Retain part(s) and/or fastener(s) for installation.
- Remove the handlebar assembly by loosening and lifting up on the fwd/back adjustment knob while sliding the assembly towards the back of the bike.
Installation instructions
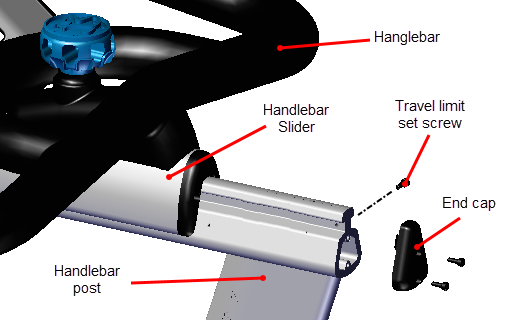
- Loosen the fwd/back adjustment knob and then reinstall the handlebar assembly by sliding the assembly rearwards onto the handlebar post.
- Slide the handlebar forward enough to allow access to handlebar assembly travel limit set screw located at the back end of the handlebar post slider. Reinstall the rear slider travel limit set screw using a 2.5 mm hex key.
- Reinstall the rear handlebar post slider end cap and secure using the two mounting 2.5 mm hex key bolts.
- (Spinner® Chrono™ Power models only)
Position the console on the handlebars and connect the data COMM cable. Adjust the cable slack and reinstall the console backplate, secure using the four hex key bolts (4x) (see the "SPINNER® CHRONO™ CONSOLE" Operator's Guide). - Verify the handlebar forward/back travel is smooth and that the handlebar slider is stopped from sliding off the post slider by the travel limit screw. For Spinner® Chrono™ Power models, verify the data COMM cable has enough slack for handlebar minimum to maximum travel adjustment.
- Verify the handlebar adjustment knob operation and that it holds the handlebar in position.
See Also
Handlebar Adjustment Knob Replacement