Drive Belt Tension & Alignment Adjustment
About
This procedure provides instruction to verify and make adjustments to the Drive Belt tension. The Drive Belt tension should be verified anytime the drive belt is removed or replaced.
|
|
NOTE: This procedure assumes that the drive belt has been installed and seated onto the drive roller and drive motor pulleys. |
Procedure
Review entire procedure before starting.
- Switch the input power OFF and unplugDisconnect a device power cord plug or cable connector from the power receptacle or outlet. the power cord.
- Remove the front hood.
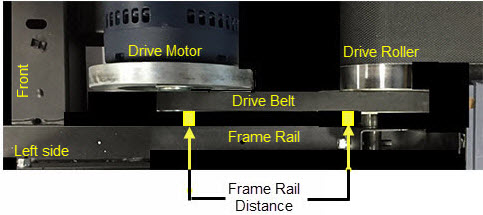
- Verify the drive belt alignment. Make sure that the drive belt is aligned parallel to the frame rail. Measure the belt to frame rail distance at the drive roller pulley and at the drive motor pulley. If the measurements are not the same, adjust the belt position on the drive motor pulley to match the drive roller belt distance.
Drive Belt Tension Verification
Drive Belt Alignment
|
|
CAUTION: Improper drive belt alignment will cause damage and/or break the drive belt. |
- Place the belt tension gauge onto the drive belt.
- Verify that the tension measurement is within the Range Limit specification, see Drive Belt Tension Specification table. Note that there is a separate Range Limit specification for New and Used belt installations.
- If the belt tension is not within the Range Limit specification; Re-tension to the OEM specification, go to Drive Belt Tension Adjustment procedure below.
- If the belt tension is within the Range Limit specification; Reinstall all covers, verify treadmill operation (see Operation Verification), and return to service.
- Remove the drive belt. It is recommended that you walk the belt off the smaller drive motor pulley.
- Loosen the drive motor mount bolts, slightly move the drive motor either forward or rearward as required to increase or decrease the belt tension. Re-tighten the bolts.
- Re-install the drive belt. It is recommended that you walk the drive belt onto the larger drive roller pulley.
- Measure and verify that the belt tension meets the Tension specification, see Drive Belt Tension Specification table. Note that there is a separate specification for New and Used belt installations:
- If the tension is not within specification, repeat the adjustment process.
- If the tension is within specification, continue procedure.
- TorqueTorque is a measure of the force that can cause an object to rotate about an axis. Bolt/nut example: 5 nM torque is equivalent to 5 newtons of force applied one meter from the center of the bolt, 6 ft-lb is equivalent to 6 lb of force applied 1 foot away from the center of the bolt. the drive motor mount bolts to 204 in-lbs (17 ft-lbs, 23 N-m).

| Belt Condition | Tension | Range Limit |
|---|---|---|
| New | 105 lbs +/- 10 (48 kgs +/- 4.5) | 95-115 lbs (43-52 kgs) |
| Used | 85 lbs +/- 5 (39 kgs +/- 2) | 80-90 lbs (36-41 kgs) |
Belt tension is adjusted by moving the drive motor position (forward or rearward) in an iterative process until the belt tension meets specification.
- PlugDevice power cord connector or electrical cable male connector that is inserted into an electrical receptacle "outlet" (also called the plug-in). in the power cord and switch the input power ON.
- Run the treadmill speed at 3 mph for 1 minute.
- Switch the power OFF and disconnect power.
- Measure and verify that the tension measurement is within the Range Limit specification, see Drive Belt Tension Specification table. Note that there is a separate Range Limit specification for New and Used belt installations.
- If the belt tension is not within the Range Limit specification, repeat the tension adjustment procedure.
- If the belt tension is within the Range Limit specification, continue procedure.
- Re-install hood.
- Connect and Switch the input power ON.
- Verify operation and return to service.
.See Also