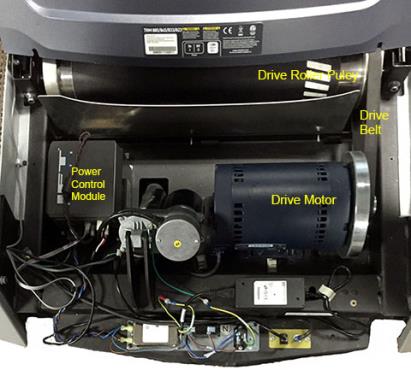
Drive Motor Replacement
About
This procedure provides instruction to remove and replace the Drive Motor.
Procedure
Review entire procedure before starting.
- Switch the input power OFF and unplugDisconnect a device power cord plug or cable connector from the power receptacle or outlet. the power cord.
- Remove the front hood.
- Disconnect the drive motor power cable connector from the OUTPUT connector on the power control module.
|
|
TIP: Remove the MCMotor controller or motor controller module fasteners so that the MC module can be raised to allow easy access to disconnect and connect the I/OInput and Output Interface. connectors. |
- Remove the drive belt. It is recommended that you walk the belt off the smaller drive motor pulley.
- Mark the outline of the current motor mounting plate which will be used as a reference position when you install the replacement motor.
- Remove the four drive motor mounting bolts. Keep bolts for replacement installation.
- Set the replacement drive motor onto the frame. Align the motor mount plate to the reference position marks, insert and tighten the four mounting bolts to the torque 204 in-lbs (17 ft-lbs, 23 N-m).
- Re-install the drive belt. It is recommended that you walk the drive belt onto the larger drive roller pulley.
- Connect the drive motor connector from the OUTPUT connector on the power control module.
- Verify that the drive belt is properly seated and aligned, see procedure.
- Verify the drive belt tension is within specification and adjust as necessary, see Drive Belt Tension & Alignment Adjustment
- Re-install hood.
- PlugDevice power cord connector or electrical cable male connector that is inserted into an electrical receptacle "outlet" (also called the plug-in). in the power cord and Switch the input power ON.
- Verify treadmill operation per "" and return to service.
.See Also