First Stage Drive Belt Tension Adjustment
About
This procedure provides instruction to adjust the First Stage Drive Belt tension.
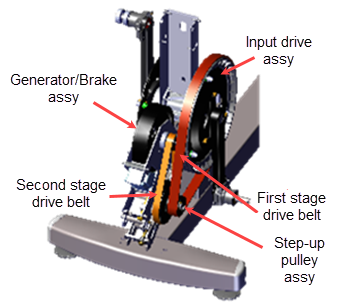
A Two-Stage Input Drive system uses a first-stage drive belt and second-stage drive belt system to connect the input drive assembly pulley to the generator/brake assembly pulley. Always adjust the first stage drive belt first and then the second stage drive belt.
|
|
IMPORTANT: Adjust the first stage drive belt tension prior to adjusting the second stage drive belt tension. |

Specifications
| System Component | Specification |
|---|---|
| First Stage Belt Drive Tension - New(1) | 140-150 lbs (63.5 - 68 kgs) |
| First Stage Belt Drive Tension - Used(1) | 125 - 135 lbs (56.7 - 61 Kgs) |
| Drive Component Assy Carriage Bolts | 180 in-lbs +/- 54 (20.3 +/_ 4.5 Nm) |
| (1) New belt tension applies to new belt first time installations. Used belt tension applies to reinstalling an existing belt or re-tensioning an existing used belt. | |
Procedure
Review entire procedure before starting.
|
|
IMPORTANT: Adjust the first stage drive belt tension prior to adjusting the second stage drive belt tension. |
- Remove the Drive Access Panel, see Drive Access Panel Replacement.
- Remove the left Drive Disk cove, see Drive Disk Covers Replacement.
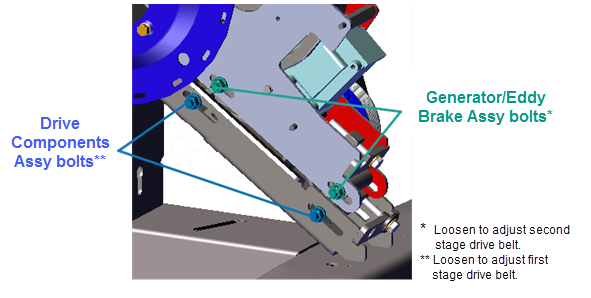
- Use a 1/2" socket to loosen the two first stage Drive Components assembly carriage bolt nuts (left side) just enough to allow assembly movement. Do not remove the carriage bolt nuts.

|
|
CAUTION: Make sure that the two Drive Components assembly bolts are loosened before adjusting the first stage belt tensioner. The tensioner hardware can be damaged and the belt cannot be tensioned if the Drive Components assembly bolts are not loosened. |
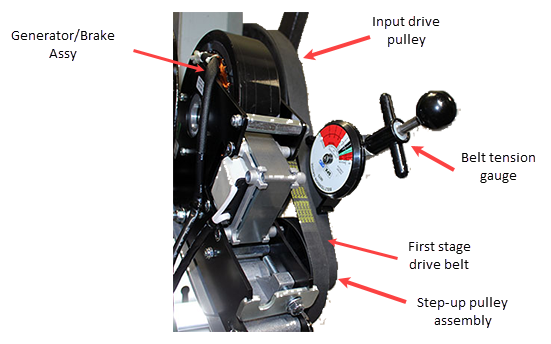
- Place the belt tension gauge onto the first stage drive belt midway between the Input Drive pulley and smaller Step-up Assembly pulley and measure the tension. Record the measured belt tension.

- Compare the measured belt tension to the first stage drive belt tension specification.
- If the tension is not within the specified Limits, do the following tension adjustment steps to bring the tension within specification:
- Remove the belt tension gauge.
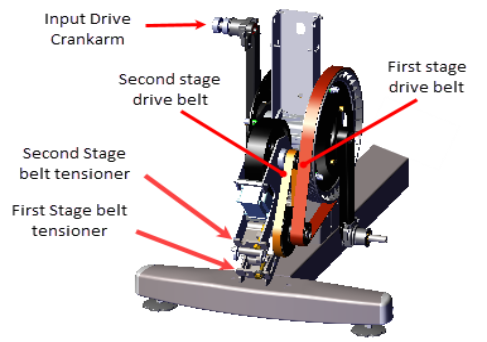
- Make a small incremental adjustment to the 1/2" First Stage Belt Tensioner bolt as needed (loosen or tighten) to bring the belt tension into specification.
- Then use the crank to rotate the input pulley a couple of rotations to seat the belt and remeasure the belt tension.
- If the belt tension is not within specification, repeat the tension adjustment process until the belt tension is correctly tensioned.

IMPORTANT: The belt tension gauge must be removed while making tension adjustments or the measurement will be invalid. 
Note: Belt tension adjustment is an iterative process, only make small tension changes per adjustment. Be careful to NOT over tension the belt, which could result in damaging the belt or pulley hardware. 
| System Component | Specification |
|---|---|
| First Stage Belt Drive Tension - New(1) | 140-150 lbs (63.5 - 68 kgs) |
| First Stage Belt Drive Tension - Used(1) | 125 - 135 lbs (56.7 - 61 Kgs) |
| (1) New belt tension applies to new belt first time installations. Used belt tension applies to reinstalling an existing belt or when re-tensioning an existing used belt. | |
- Use a 1/2" socket to tighten the two Drive Components assembly carriage bolts (left side), torque bolts to 180 in-lbs +/- 54 (20.3 +/_ 4.5 Nm).
- Measure and verify that the second-stage drive belt is within specification, retention the belt as needed, see Second Stage Drive Belt Tension Adjustment.
- Reinstall the left Drive Disk cove, see Drive Disk Covers Replacement.
- Reinstall the Drive Access Panel, see Drive Access Panel Replacement.
- Verify machine operation and return to service, see Operation Verification.
See Also
Second Stage Drive Belt Tension Adjustment