Battery Replacement
(Spinner® ChronoSpinner® Chrono™ Power bike.™ Power models only)
About
This procedure provides instruction to determine the condition of the battery and replacement procedure.
Specifications
| Battery Voltage | Specification |
|---|---|
| Battery Specification | 6 VDC, 1.2 AH |
| GOOD battery state* | 5.8 - 6.6 VDC* |
| LOW battery state* | 5.5 - 5.7 VDC* |
| Console OFF state* | < 5.4 VDC* |
| Charging voltage (while pedaling) |
7.5 VDC max |
| Note: * static voltage measurements: no pedal movement and no power adapter connected. | |
Determining the battery condition
If the measured voltage is below 5.5 Vdc, charge the battery by pedaling greater than 55 rpm (or using an optional battery adapter) until the battery static (non-pedaling) voltage level reaches 5.8 to 6 Vdc.
If the static battery voltage will not charge to and remain at 5.8 - 6 Vdc:
- While pedaling the bike, make sure the battery charging voltage is greater than 6 Vdc (7.5 Vdc max). Access the console service test menu, select the BAT VOLT parameter to read the battery charging voltage, see Spinner® Chrono™ Console.
- Stop pedaling the bike and verify that the battery voltage remains ≥ 5.8 Vdc. If not, replace the battery. If the battery does not remain ≥ 5.5 Vdc after a few hours with no pedaling, replace the battery
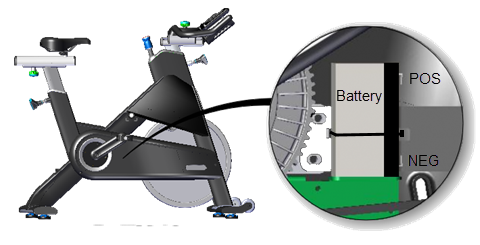
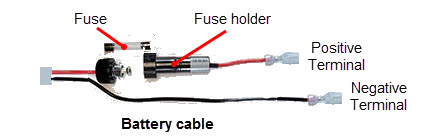
Battery Fuse
The inline battery fuse is part of the battery assembly cable red wire connected to the battery positive terminal. To remove the fuse, open the fuse holder by twisting the fuse holder top cap and removing the fuse.
Fuse specification: Inline fuse, 5 amp/250 Vdc
Procedure
Review entire procedure before starting.
Removal procedure
- Remove the front and rear belt guard covers, see Belt Guard Cover Replacement.
- Determine the battery condition, see Determining the battery condition .
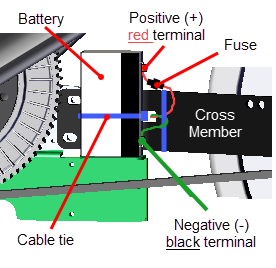
- Carefully disconnect the battery cable Black wire from the Negative (-) battery terminal and then the Red wire from the Positive (+) battery terminal. Disconnect the battery Negative (-) terminal wire first:
- Cut the cable tie that is securing the battery to the cross member and remove the battery.
Installation procedure.
- Place the battery on the cross member and secure with an 8" cable tie.
- Carefully reconnect the battery cable Red wire to the Positive (+) battery terminal and then the Black wire to the Negative (-) battery terminal. Reconnect the Negative terminal cable last.
- Slowly pedal the bike enough to power ON the console, access the console service test menu BAT VOLT parameter (see Spinner® Chrono™ Console). Continue pedaling and verify that the battery voltage is between 6.0 - 7.5 Vdc, then stop pedaling and verify that the voltage remains ≥ 5.8 Vdc. If the battery voltage is low, start pedaling faster than 55 rpm to charge the battery until the non-pedaling voltage remains at ≥ 6 Vdc (a new battery may need to be charged.).
- Replace the front and then rear belt guard covers, see Belt Guard Cover Replacement.
- Verify the bike operation per Operation Verification Checklist and return to service.
.See Also