Running Belt Tension and Tracking Adjustment
About
This procedure provides instructions to verify and make adjustments to the running belt tension and tracking alignment. The running belt tension and tracking should be verified anytime the running belt alignment is not centered or the running belt is replaced.
|
|
NOTE: Proper tensioning of the belt requires the use of two tensioning gauges, Precor part number PPP000000020007101.... |
Procedure
Review entire procedure before starting.
- Remove the front hood, and left/right side step covers.
- Remove the drive motor belt from the drive roller pulley. . If is recommended that you walk the belt off the smaller drive motor pulley.
Running Belt Tension adjustment
|
|
NOTE: The drive motor belt must be removed to properly adjust the running belt tension. |
- Remove tension from the rear take-up roller. Alternately loosen the left and right bolts to equally remove the belt tension.
- Center the running belt and make sure that it is squarely positioned from the front Drive roller to the rear Take‑Up roller.
- Move the running belt so that the seam is positioned underneath the treadmill.
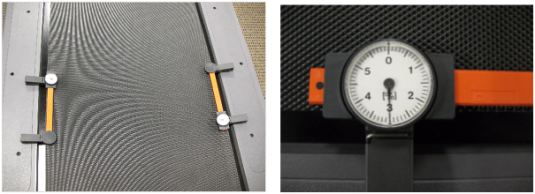
- Attach a running belt tension gauge on each side of the running belt opposite each other.
- Slide the gauge head to set the dial needle to a coarse setting of 3. You can then rotate the gauge dial face to fine tune the needle to precisely 3.
|
|
NOTE: Setting the gauge to a 3 reference value centers the gauge head travel allowing +/- movement without impeding travel. |
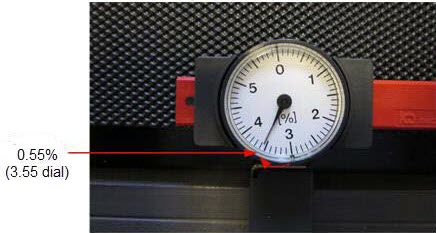
- Alternately tighten the right and left take-up roller mounting bolts in increments of 0.2% so that the roller is evenly tensioned to the final 0.55% (dial 3.55) specification as follows:
- Tighten the right bolt to dial setting 3.2, then the left bolt to 3.2.
- Tighten the right bolt to dial setting 3.4, then the left bolt to 3.4
- Tighten the right bolt to dial setting 3.55 (0.55%), then the left bolt to 3.55 (0.55%)
- Remove the tension gauges.
- Re-install the drive belt .Install by walking the belt onto the larger drive roller pulley. Make sure that the belt alignment is parallel to the frame rail, see .
- Start the treadmill and set the speed to 3 mph (5 kph).
- Observe and verify that the running belt tracking remains centered, adjust as required:
- If the belt starts to drift toward the right, slowly turn the right side Take‑Up roller mounting bolt clockwise in ¼ turn increments until the drifting stops.
- If the belt starts to drift toward the left, slowly turn the right side Take‑Up roller bolt counterclockwise in ¼ turn increments until the drifting stops.
Running Belt Tracking Adjustment
|
|
NOTE: 1) The tracking adjustments should only be done in 1/4 turn increments. |
- Increase the speed to 9 mph (14 kph) and then 12 mph (19 KPH) making sure that the tracking remains centered, make small adjustments as needed.
- Verify that the treadmill is level, adjust as necessary.
- Verify the running belt/deck surfaces are clean.
- Replace all covers.
- Verify treadmill operation (see ) and return to service.
![]()
.See Also