Running Belt and Deck Replacement
About
This procedure provides instruction to remove and replace the Running Belt.
|
|
CAUTION: Two running belt gauges, Precor part number 20007-101, are required. It is important that this procedure be followed to maintain correct drive belt and running belt tension. Improper tensioning of the belt will lead to premature running belt wear, premature driver roller bearing failure and premature Take‑Up roller bearing failure. |
Procedure
Review entire procedure before starting.
- Switch the input power OFF and unplugDisconnect a device power cord plug or cable connector from the power receptacle or outlet. the power cord.
- Remove the front hood.
-
Remove the end cap and belt guard covers (see End Cap & Belt Guard Cover Replacement).
-
Remove the left and right deck trim covers
- Remove the Take‑Up roller, see Take‑Up roller Replacement.
- Remove the Drive Roller, see Drive Roller Replacement.
-
Remove the four mounting bolts and the roller guard that hold the deck to the frame.
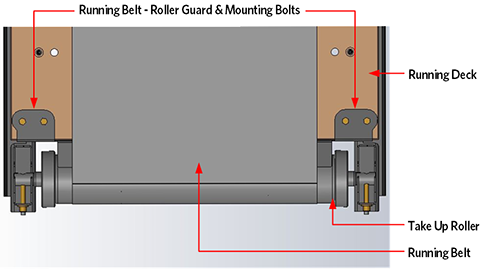
- Lift the deck and running belt up and away from the treadmill.
- If installed, remove the Auto Stop magnet from the deck, see Auto Stop Magnet Replacement.
- Slide the running belt off the deck and discard. Remove and keep the deck mounting inserts.
- If the deck has already been flipped (flipped surface is used), discard and replace with new deck. Re-install the deck mounting inserts.
- If the deck has not be flipped (flipped surface is new), flip deck and re-install the deck mounting inserts into the used side of the deck surface.
-
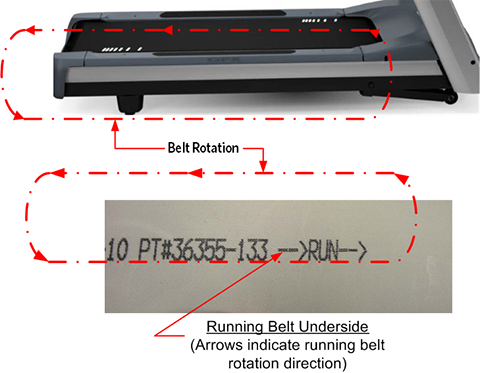
The new running belt will have a directional arrow placed on the inside of the belt. The arrow indicates the correct direction of travel. Slip the running belt onto the deck with the arrow pointing in the direction of travel.
|
|
CAUTION: Incorrectly installed running belt direction will cause the belt to wear prematurely. |
- Carefully place the deck with running belt onto the deck.
- Reinstall the Auto Stop Magnet on the right front corner of the deck, see Auto Stop Magnet Replacement.
- Slide the take up roller though the running belt and install in the frame mounting bracket. Hand tighten the mounting bolts into the take up roller shaft.
- Align the bottom plate and pivot bracket holes with the running deck bolt holes. Replace the roller guard, install and hand tighten the deck mounting bolts.
-
Verify that the spacing on all four corners is the same, adjust as necessary.
- Check the alignment of the magnet and the auto stop assembly, see Auto Stop Sensor Replacement.
- Tighten and torque the Deck mounting bolts to 150 in-lbs (17 N-m).
- Reinstall the Drive Roller and Drive Belt, see Drive Roller Replacement.
- Reinstall the Take‑Up roller, see Take‑Up roller Replacement.
- Tension and verify the running belt tracking, see Running Belt Tension and Tracking Adjustment.
- Replace the belt guard cover ensuring the tabs are firmly locked into position on the Take‑Up roller shaft, see End Cap & Belt Guard Cover Replacement.
- Replace the end cap, see End Cap & Belt Guard Cover Replacement.
-
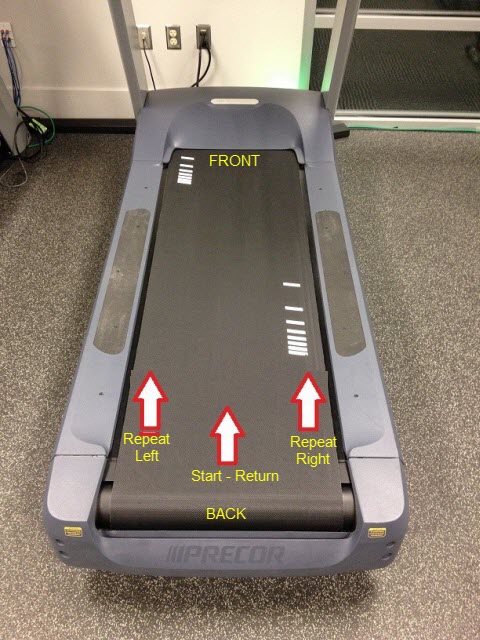
Straddle the running belt and set the speed to 3 mph (5 kph). While holding the treadmill handles, walk onto the middle of the running belt starting from the back walking to the front and returning to the back. Repeat walking process 4 times.
-
Repeat the process on walking on the right side of the belt.
-
Repeat the process walking on the left side of the belt.
New Deck break-in
|
|
NOTE: It may be necessary to override the treadmill auto-stop function. |
-
Stop the treadmill and step off the belt.
-
Set the treadmill to the maximum speed and run for 3 minutes.
|
|
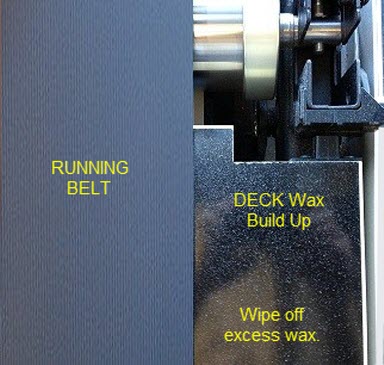
NOTE: This process helps to remove excess wax from the belt. |
-
Clean up any loose wax from the deck sides and frame.
- Verify treadmill operation (see ) and return to service.
.See Also