Running Belt Tension and Tracking Adjustment
About
This procedure provides instructions to verify and make adjustments to the running belt tension and tracking alignment. The running belt tension and tracking should be verified anytime the running belt is replaced or the belt tracking is not centered.
Tools
|
|
|
|
Note: Proper tensioning of the belt requires the use of two tensioning gauges, Precor part number PPP000000020007101. |
Specification
| System Component | Specification |
|---|---|
| Ammeraal Beltech brand running belt tension (gauge/percent)(2) | (Undefined variable: Specifications.TRM14TRM800 version 2 treadmills mfg. dates 2014 and later.-AmeraalRunBeltTension)(1) |
| Forbo brand running belt tension (gauge/percent)(3) | 3.55 (0.55%)(1) |
|
Notes: |
|
Procedure
|
|
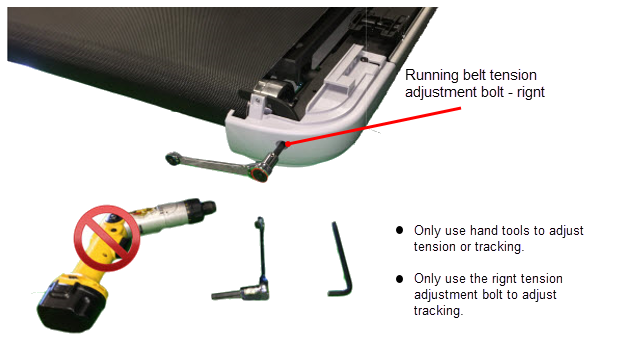
CAUTION: | 1) The tracking adjustments should only be done in 1/4 turn increments. 2) ONLY use the right side tension bolt to adjust tracking. 3) ONLY use hand tools to adjust tracking. |
Running belt tension adjustment
Review entire procedure before starting.
- Clean the running belt and deck, see Running Belt and Deck Cleaning Procedure.
- Switch the power OFF and unplugDisconnect a device power cord plug or cable connector from the power receptacle or outlet. the power cord.
- Remove the front hood and left/right trim landing covers, see Covers and Panels Replacement.
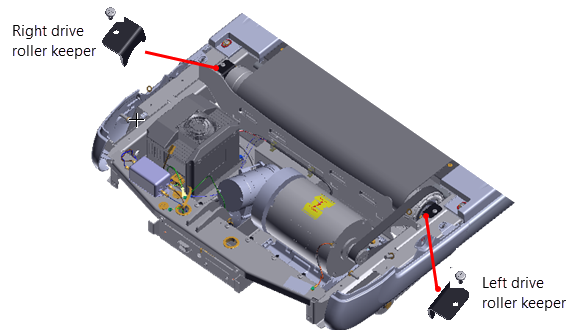
- Make sure that the left and right Roller Keeper(s) are installed.
|
|
Note: TRM800-16 Treadmills - Some early production TRM800-16 treadmills may only have one or no Roller keepers installed ( PPP000000302495102 RIGHT HAND ROLLER KEEPER, PPP000000302495102 LEFT HAND ROLLER KEEPER). |
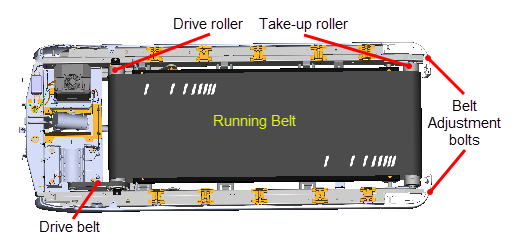
- Relax the running belt tension by loosening the left and right 5/16" hex key tension adjustment bolts. Alternately loosen the left and right adjustment bolts in 1/4 turn increments to evenly remove tension.
|
|
Note: It is not necessary to remove the adjustment bolts. Loosen bolts until the take-up roller adjustment cassette touches the frame. No further loosening is required. If the bolt is removed, remove the trim end cap cover and reinstall the bolt. |
|
|
CAUTION: Only use hand tools to adjust tension. Power tools can easily over and/or under tension causing damage to the belt and/or tension hardware mechanism. |
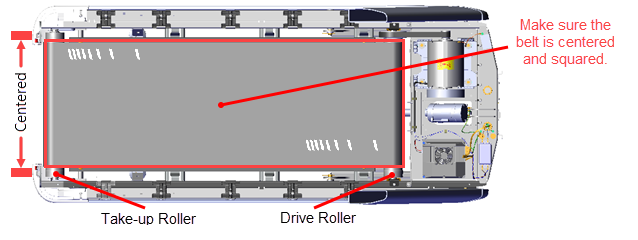
- Verify that the running belt is centered and squarely positioned from the front Drive roller to rear Take‑up roller.
- Move the running belt so that the seam is positioned underneath the treadmill.
- Attach a running belt tension gauge on each side of the running belt opposite each other. Place the gauges so that the trim landing mounting brackets do not interfere with the gauge movement.
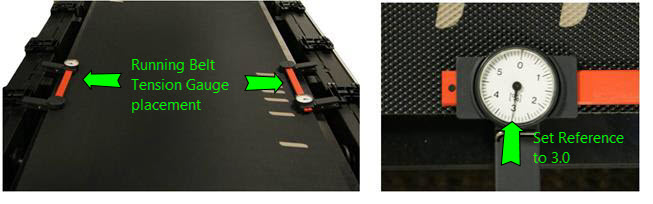
- Slide the gauge head to set the dial needle as close as possible to 3.0 (0.0%) and clip the gauge onto the belt edge. Then rotate the gauge dial face to fine adjust the needle to precisely 3.0 (0.0%)
|
|
Note: Setting the gauge to a 3.0 reference value centers the gauge head travel allowing +/- movement without impeding travel. |
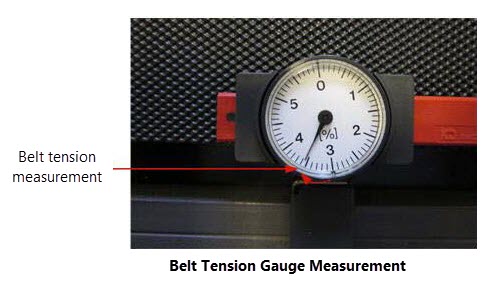
- Alternately tighten the right and left running belt tension adjustment bolts in increments of 0.2 (0.2%) dial divisions so that the belt is evenly tensioned to the manufacturer specification:
- Incrementally and alternately tighten the left and right adjustment bolts entail each gauge dial reaches a value of 3.0.
- Tighten the right adjustment bolt to dial setting 3.1, then the left adjustment bolt to 3.2.
- Tighten the right adjustment bolt to dial setting 3.3, then the left adjustment bolt to 3.4.
- Tighten the right adjustment bolt to dial setting 3.55 (0.55%), then the left bolt to 3.55 (0.55%).
- Remove the tension gauges.
| Running Belt Brand | Specification |
|---|---|
| ammeraal brand running belt tension (gauge/percent) | (Undefined variable: Specifications.TRM14-AmeraalRunBeltTension)* |
| Forbo brand running belt tension (gauge/percent) | 3.55 (0.55%)* |
| Notes: * Referenced to gauge reading 3.0 (0.0%) | |
Running belt tracking adjustment
Review entire procedure before starting.
- Connect the power cord and switch the power ON.
- Start the treadmill and set the speed to 3 mph (5 kph).
- Observe and verify that the running belt tracking remains centered, if the belt does not remain centered, follow the following instruction to make adjustments:
- If the belt starts to drift toward the right, slowly turn the right side tension adjustment bolt clockwise in ¼ turn increments until the drifting stops.
- If the belt starts to drift toward the left, slowly turn the right side tension adjustment bolt counterclockwise in ¼ turn increments until the drifting stops.
- Increase the speed to 6 mph (10 kph) verify tracking, then increase the speed to 9 mph (14 kph) verify tracking, and finally increase the speed to 12 mph (19 kph) and verify tracking. Make sure that the tracking remains centered at each speed, make small adjustments as needed.
- Make sure that the treadmill is setting level and stable, adjust the two rear leveling feet as necessary.
|
|
Note: An unlevel unstable treadmill can cause tracking issues with use. |
- Replace the hood and left/right trim landing covers, see Covers and Panels Replacement.
- Verify treadmill operation (see Operation Verification) and return to service.