Drive Belt Tension and Alignment Adjustment
About
This procedure provides instruction to verify and make adjustments to the Drive Belt alignment and tension. The Drive Belt alignment and tension should be verified anytime the Drive Belt is removed or when unusual belt noises are heard during normal operation.
|
|
IMPORTANT: This procedure assumes that the Drive Belt is installed, see Drive Belt Replacement. |
Specifications
| Belt Condition(1) | Calibration Belt Tension |
Verification Belt Tension |
|---|---|---|
| New(1) | 110 lbs +/- 10 (50 kgs +/- 4.5) | 100-120 lbs (45-54 kgs) |
| Used(1) | 85 lbs +/- 5 (39 kgs +/- 2) | 80-90 lbs (36-41 kgs) |
| (1) New belt tension applies to new belt first time installations. Used belt tension applies to reinstalling an existing belt or re‑tensioning an existing used belt | ||
Procedure
Review entire procedure before starting.
Drive belt alignment adjustment
|
|
CAUTION: Improper Drive Belt alignment can cause unusual operating noises and will eventually cause damage to the drive belt and/or the motor or roller pulley hardware. |
- Remove the hood, see Hood Cover Replacement.
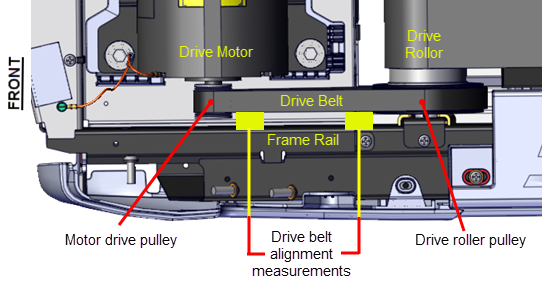
- Make sure that the Drive Belt is aligned parallel to the left side frame rail. Measure the drive belt‑to‑frame rail distance at two places, at the Roller pulley and at the Drive Motor pulley. The Drive Belt is correctly aligned when the two measured distances are the same:
- If the measurements are not the same, adjust the belt position on the Drive Motor pulley to match the Roller belt distance.
- Run the treadmill at 3 mph (5 kph) for one minute to allow the belt and pulley groves to properly align and seat. Verify the Drive Belt remains aligned. Readjust if alignment has changed.
Drive Belt tension adjustment
Belt tension adjustment is an iterative process that requires removing the Drive Belt for each incremental tension adjustment. The process entails: making a belt tension measurement, removing the Drive Belt from the motor pulley, changing the motor position to adjust the belt tension. reinstalling the belt, and then verifying the adjusted belt tension. The process is repeated until the belt tension meets specification.
Belt tension verification
- Switch the input power OFF and unplugDisconnect a device power cord plug or cable connector from the power receptacle or outlet. the power cord.
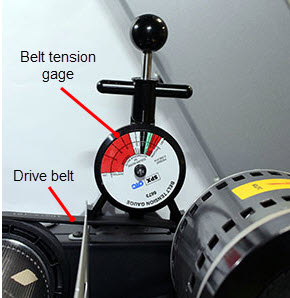
- Place the belt tension gauge onto the Drive Belt mid distance between the motor and roller pulleys.
-
Verify that the Drive Belt tension is within New or Used Drive Belt tension Verification Belt Tension specification:
- If the belt tension is not within the belt Verification Belt Tension specification; continue procedure to adjust tension to the tension Calibration Belt Tension specification.
- If the belt tension is within the Verification Belt Tension specification; skip the tension adjustment and skip to Operation verification.
- Walk the belt off the Drive Motor pulley. You can use your free hand to move the motor flywheel to rotate the motor pulley and drive belt.
- Loosen the four 1/2" hex Drive Motor mount fasteners and adjust the motor position as needed (forward to increase tension or rearward to decrease tension) to meet the belt tension Calibration Belt Tension specification. Only make small incremental changes in motor position per adjustment to prevent over tensioning the belt.
| Belt Condition | Verification Belt Tension |
|---|---|
| New | 100-120 lbs (45-54 kgs) |
| Used | 80-90 lbs (36-41 kgs) |
Belt tension calibration adjustment
| Belt Condition | Calibration Belt Tension |
|---|---|
| New | 110 lbs +/- 10 (50 kgs +/- 4.5) |
| Used | 85 lbs +/- 5 (39 kgs +/- 2) |
|
|
CAUTION: Only make small incremental changes to motor position per tension adjustment. Do not over tension the belt which could cause damage to the belt or motor pulley mechanism. |
- Re-tighten the four motor mount fasteners and torque to specification 204 in-lbs (17 ft-lbs, 23 N-m).
- Reinstall drive belt. Place Drive Belt onto the motor pulley and walk the belt onto the Roller pulley. You can use your free hand to move the motor flywheel to rotate the motor pulley and drive belt.
- Place the tension gauge onto the belt and remeasure the tension.
- If the tension measurement does not meet the Calibration Belt Tension specification, repeat the tension adjustment process until the measured tension is within the Calibration Belt Tension specification.
- Connect the power cord and switch the input power ON.
- Run the treadmill speed at 3 mph (5 kph) for 1 minute.
- Switch the input power OFF and unplug the power cord.
- Remeasure the belt tension and verify that the tension remains within the Verification Belt Tension specification. If not within specification, make adjustments as needed, see Belt tension calibration adjustment .
- Verify that the Drive Belt alignment is correct and has not moved out of alignment, see Drive Belt Tension and Alignment Adjustment.
- Reinstall the hood cover.
- Connect the power cord and switch the input power ON.
- Do the Operation Verification tests (see Operation Verification) and return to service.
| Belt Condition | Verification Belt Tension |
|---|---|
| New | 100-120 lbs (45-54 kgs) |
| Used | 80-90 lbs (36-41 kgs) |