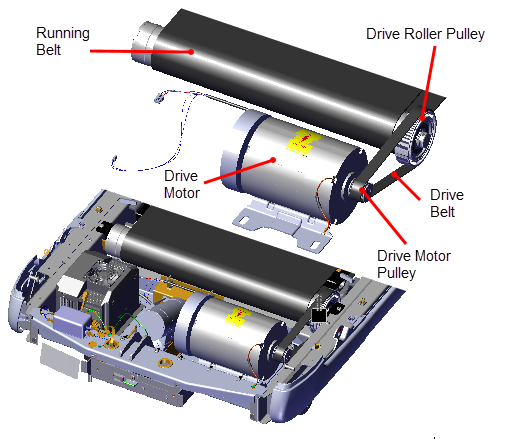
Drive Belt Replacement
About
This procedure provides instruction to remove and install the Drive Belt
Procedure
Review entire procedure before starting.
Removal Instructions
- Switch the power OFF and unplugDisconnect a device power cord plug or cable connector from the power receptacle or outlet. the power cord.
- Remove the hood cover, see Covers and Panels Replacement.
- Remove the left and right trim landing covers, see Trim Landing Covers Replacement.
- Relax the running belt tension by loosening the left and right 5/16" hex key tension adjustment bolts. Alternately loosen the left and right adjustment bolts in 1/4 turn increments to evenly remove left and right tension. Only use hand tools and not power tools which can easily over or under tension the belt causing damage to the belt and/or take-up roller tension mechanism.
|
|
CAUTION: Only use hand tools to adjust tension. Power tools can easily over and/or under tension causing damage to the belt and/or tension hardware mechanism. |

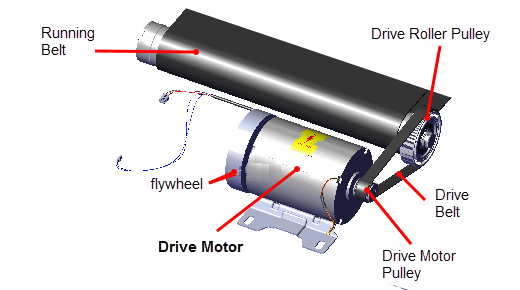
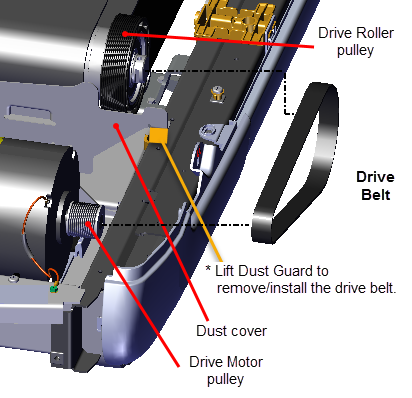
- Walk the Drive Belt off the Drive Roller pulley and then the Drive Motor pulley. Temporarily place the Drive Belt on the inside of the Drive Roller pulley.
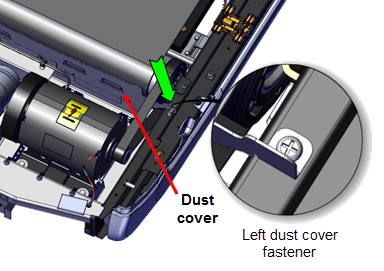
- Remove the left side Dust Guard #3 Phillips screw fastener. Retain fastener hardware for installation.
|
|
TIP: Use (turn) the Drive Motor flywheel to make it easier to turn the motor pulley and help walk the belt onto or off the Drive Motor and Drive Roller pulleys. |
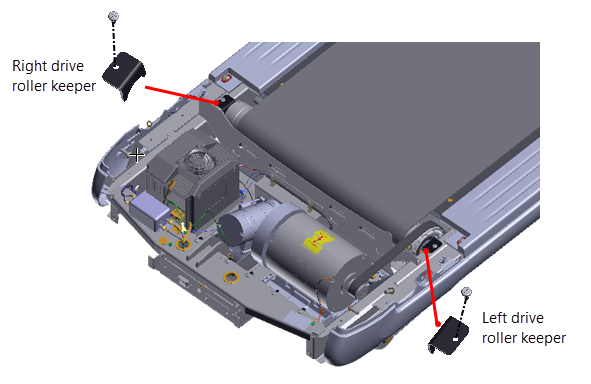
- Remove the left and right Drive Roller Keepers (one #3 Phillips screw per keeper). Retain fastener hardware for installation.
- Lift the Drive Roller enough to remove the Drive Belt off the pulley. Lift the left side of the Dust Guard enough to slide the belt from the Dust Guard and remove from the treadmill.
Installation Instructions
- Lift the left side of the Dust Guard enough to install the Drive Belt over the Dust Guard.
- Lift the Drive Roller enough to place the Drive Belt onto the Drive Roller pulley. Reinstall the Drive Roller into the left and right mounting brackets.
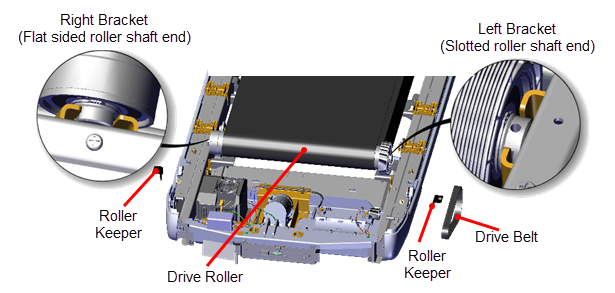
- Reinstall the left and right Drive Roller Keepers and secure using the #3 screw fasteners (one fastener per Keeper).
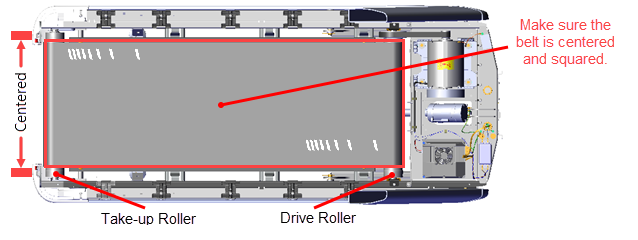
- Center and square the running belt on the Drive and Take-up Rollers. Tension the running belt to specification, see Running Belt Tension and Tracking Adjustment. Do not verify tracking or apply power at this step in the process, the running belt tracking will be verified after the Drive Belt is installed.
- Install the drive belt. Place the Drive Belt onto the drive pulley and then walk the belt onto the Drive Motor pulley.
|
|
TIP: Use (turn) the Drive Motor flywheel to make it easier to turn the motor pulley and help walk the belt onto or off the Drive Motor and Drive Roller pulleys. |
- Reinstall the left side Dust Guard #3 Phillips fastener and fully tighten.
- Make sure the Drive Belt pulley alignment is correct and then tension the Drive Belt to specification. see Drive Belt Tension and Alignment Adjustment.
- Connect the power cord and switch the power ON.
- Operate the treadmill and verify the running belt tracking, see Running Belt Tension and Tracking Adjustment.
- Reinstall the left and right trim landing covers, see Trim Landing Covers Replacement.
- Reinstall the hood cover, see Covers and Panels Replacement.
- Do the Operation Verification tests (see Operation Verification) and return to service.