Step-up Pulley/Tensioner Assembly Replacement
About
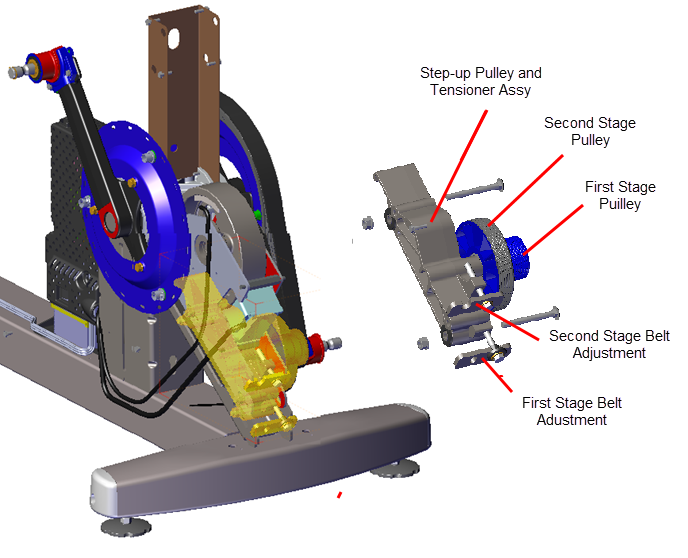
This procedure provides instruction to remove and install the Step-up Pulley/Tensioner Assembly.
The Step-up Pulley/Tensioner Assembly contain the step-up pulleys and the first and second stage drive belt tensioners
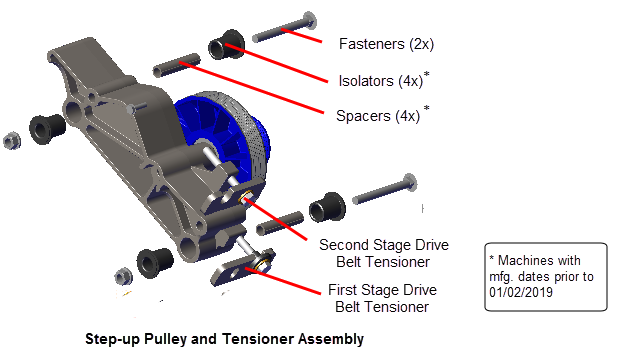
Step-up Pulley/Tensioner Assembly Exploded View
Procedure
Review entire procedure before starting.
Removal Instructions
- Remove the Drive Access cover, see Drive Access Panel Replacement.
- Remove the left and right Drive Disk covers, see Drive Disk Covers Replacement.
- Remove the left and right Stairarms from the Input Crank, see Stairarm Input Drive Crank Removal.
- Remove the Drive Top and left/right Drive Housing covers see Drive Housing Covers Replacement.
- Remove the Drive Components assembly, see Drive Components assembly Replacement.
|
|
TIP: For machines with mfg. dates prior to 01/02/2019, the Step-up Pulley/Tensioner assembly spacers (2x) and bolt isolators (4x) can easily fall out of the mounting holes. Take care to keep track of these components for installation, see Step-up Pulley/Tensioner Assembly Exploded View. |
- Use a 1/2" socket to loosen the second stage belt tension and walk the second stage drive belt off the pulleys. Remove the second stage drive belt.
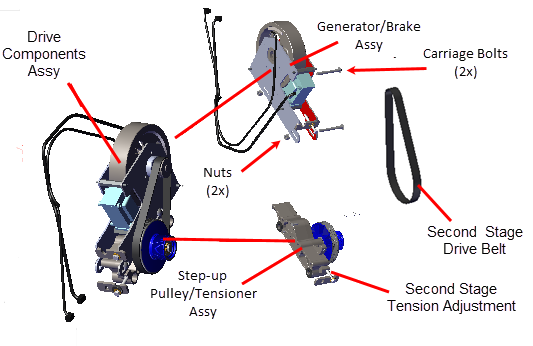
- Use a 1/2" socket to remove the two carriage bolt fasteners to separate the Generator/Eddy Brake assembly from the Step-up Pulley/Tensioner Assembly.
Installation Instructions
- Place the Generator/Brake assembly onto the Step-up pulley/Tensioner assembly. Secure using the two carriage bolts and nuts. Tighten the bolts just enough to keep the carriage bolt heads inserted into the bolt belt adjustment slots to allow movement. Do not fully tighten.
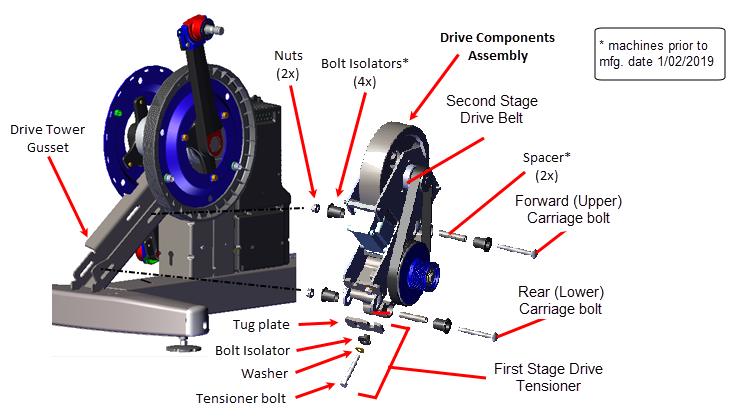
- Use a 1/2" socket to install the second stage belt tension hardware: the tensioner adjustment bolt, washer, and tug plate. Tighten the tensioner bolt just enough to keep the tensioner hardware in place.
- Reinstall the second stage drive belt by walking the belt onto the larger Step-up Pulley/Tensioner pulley and Generator/Brake assembly pulley. Tighten the tensioner bolts just enough to keep the belt on the pulleys and tensioner hardware in place. Do not fully tension or over tension the belt.
- Reinstall the Drive Components assembly, see Drive Components assembly Replacement.
- Adjust the first stage drive belt tension, see First Stage Drive Belt Tension Adjustment.
- Adjust the second stage drive belt tension, see Second Stage Drive Belt Tension Adjustment.
- Reinstall the right and left Drive Housing and Drive Top covers, see Drive Housing Covers Replacement.
- Reinstall the left and right Stairarms onto the Input Drive Crank, see Stairarm Input Drive Crank Installation.
- Reinstall the left and right Drive Disk covers, Drive Disk Covers Replacement.
- Reinstall the Drive Access cover, see Drive Access Panel Replacement.
- Verify machine operation and return to service, see Operation Verification.
.See Also
Drive Components assembly Replacement